Try Weglot for free


Are you thinking about adding a WordPress language switcher to your website? If so, keep reading!
Adding a language switcher to your WordPress site and translating your content so visitors can read it in their own language can help you reach new markets, provide greater opportunities for SEO and online visibility, and help you establish trust with new audiences. Not sure which plugin to use? Check out our comparison of best WordPress language switcher plugins.
With Weglot, you can add multiple languages to your WordPress site or WooCommerce store with no code required, and review every translation in context before it goes live.
In this article, we’ll provide a detailed step-by-step guide on how to add a WordPress language switcher to your site and how to customize it to fit your site’s design.
A WordPress language switcher is a navigation element that lets visitors select their preferred language and switch between translated versions of your site. You can add one to any WordPress site by installing a translation plugin, selecting your languages, and placing the switcher in your menu, widget area, or page via shortcode.
Weglot 2.0 builds on the Weglot you know: an AI-powered translation plugin for WordPress that adds a language switcher automatically, translates your site with no code using AI translations built around your brand, and creates SEO-ready language subdirectories with hreflang tags and translated metadata. You can choose to add a WordPress language switcher to your site in a variety of locations, including your menu, to a widget, or in the source code of your HTML page.
In this tutorial, we’ll add a language switcher to your site's navigation. By default, Weglot adds the language switcher to the bottom right of your site. We’ll then show you how to move it either via your plugin settings or from Weglot’s Visual Editor, where the Switcher Editor also lets you change its design.
Install and activate the Weglot plugin on your WordPress site. Then, create a Weglot account: during setup you’ll enter your site’s URL, pick your original and target languages, and set up your Brand Voice and Translation Guidelines so the translations match how you write. Your Weglot dashboard is where you’ll manage and edit your translations and copy your unique API key for the integration.

Click into the Weglot tab in your WordPress dashboard, open Settings, and paste your API key. Your original language and the languages you chose when you created your project appear underneath (to change them later, head to your Weglot dashboard). Click save.
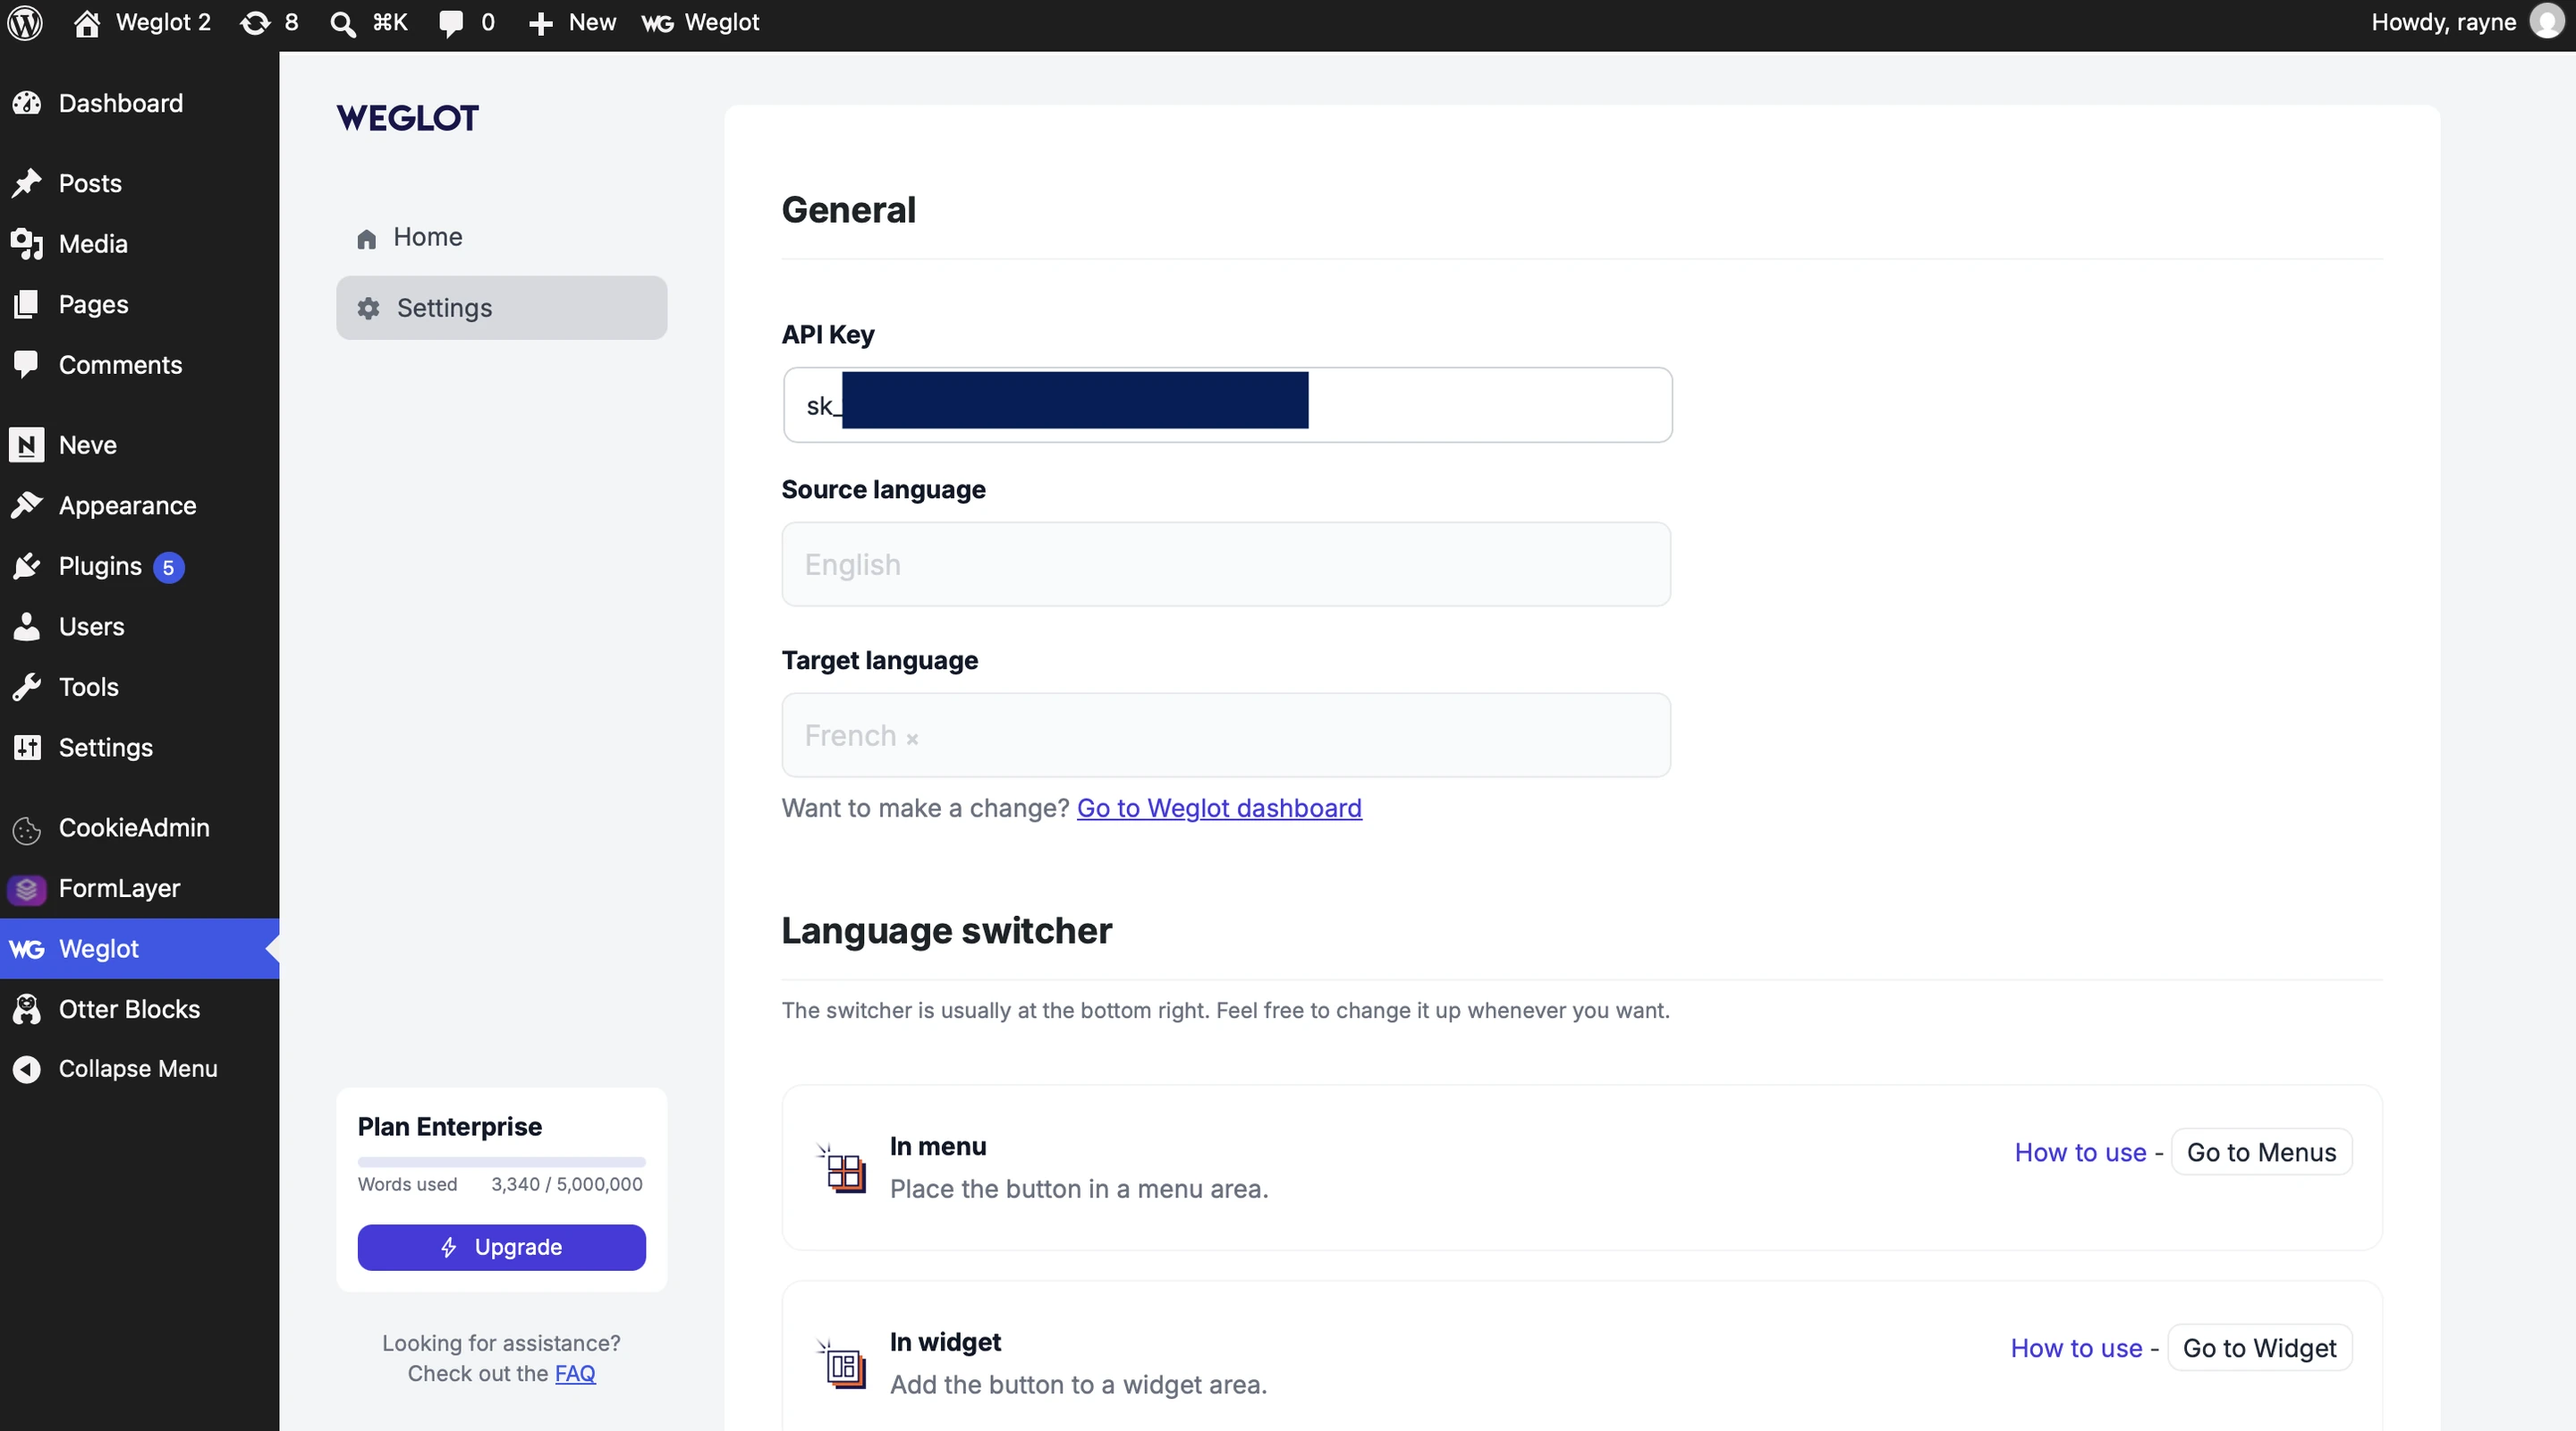
Your WordPress website is now multilingual! Weglot has automatically detected your site’s content, used AI to translate it, and displayed it under language subdirectories.
Take a look at the front end of your site, and you’ll see a new WordPress language switcher at the bottom-right corner.
When you click it, it’ll expand to display your available languages and let you choose and display your preferred translation.

This is the default design that comes with Weglot, and you can now customize the look and location of your WordPress language switcher in a few different ways.
To start making basic customizations, go to Weglot > Settings in the WordPress back end. The Language switcher section is where you set the placement: in a menu, in a widget, with a shortcode, or in the source code of your page (we’ll walk through this below):
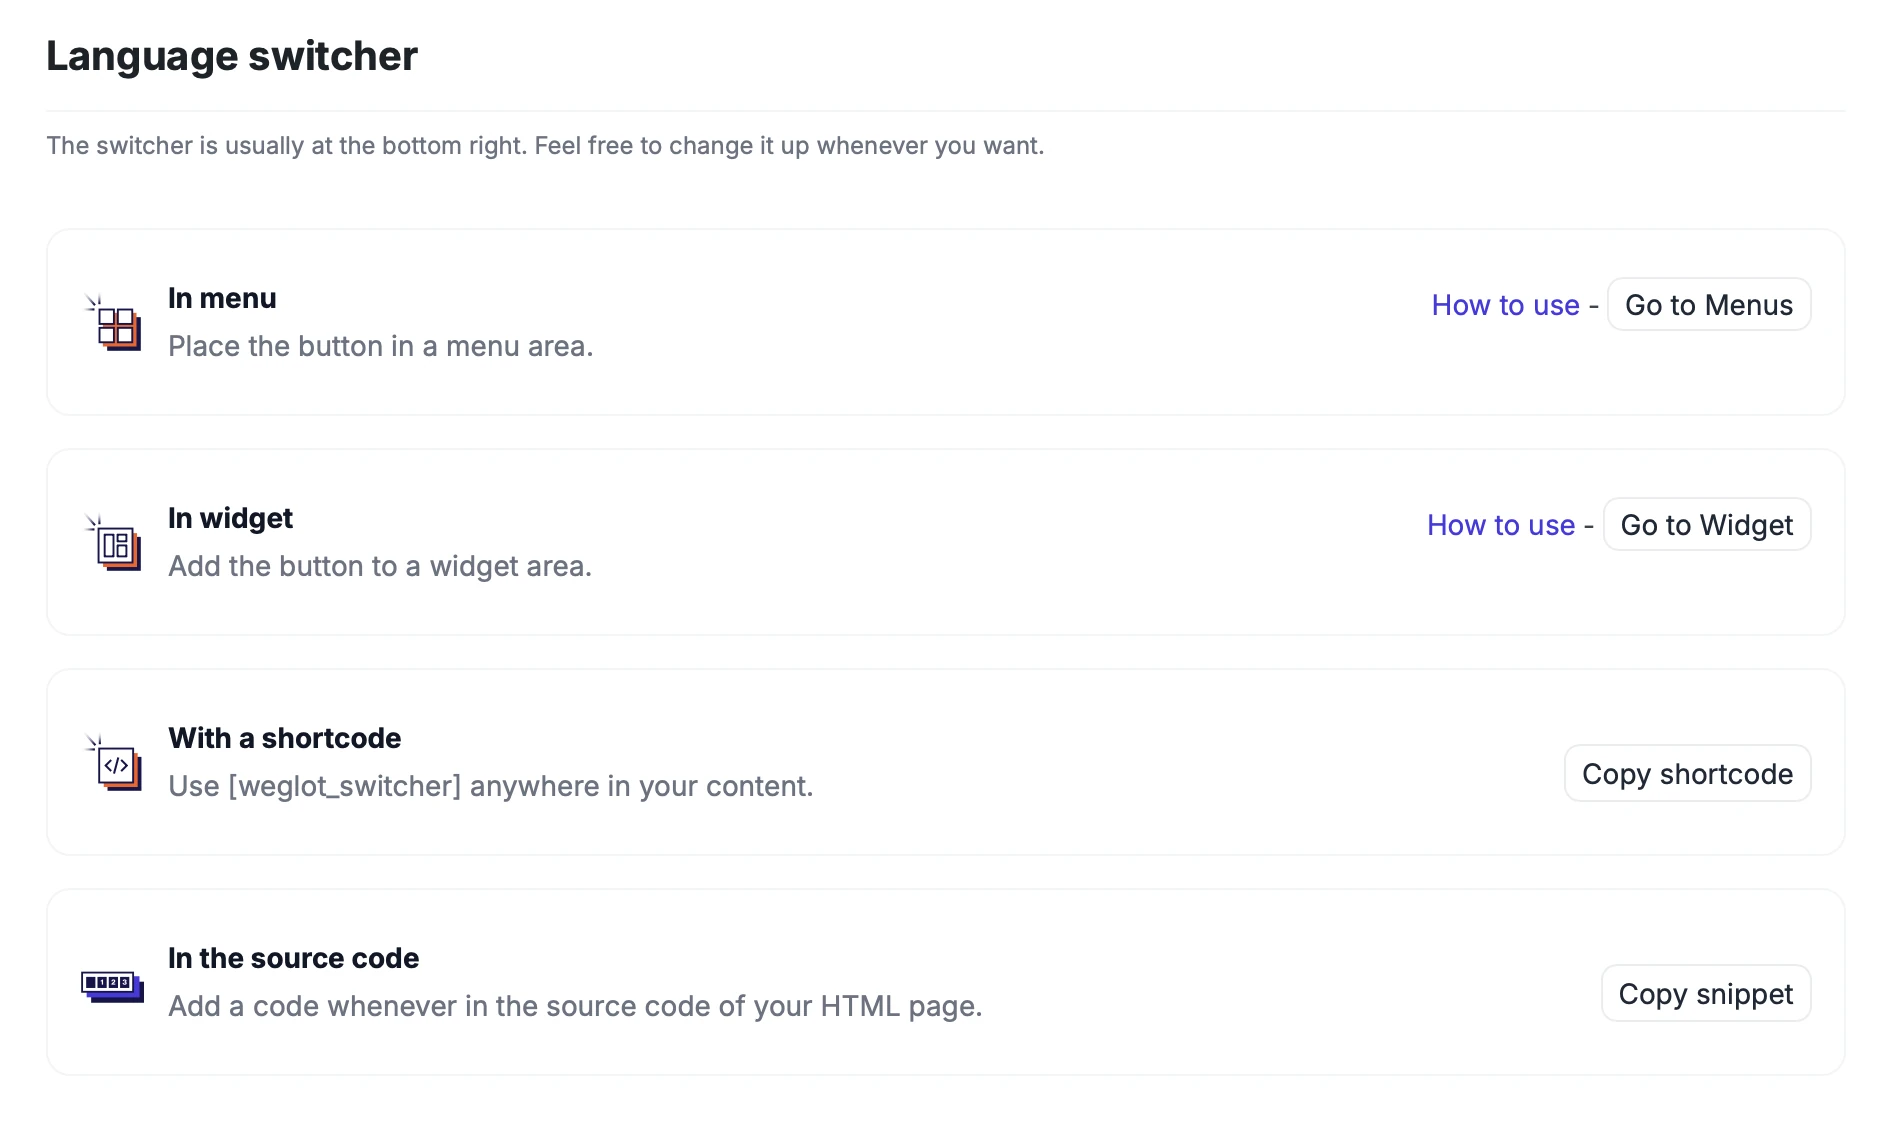
The look of the switcher is handled in the Switcher Editor, which opens from Weglot’s Visual Editor when you click the language switcher on your site. In the editor, you can choose:
There’s also a Custom CSS field for your own selectors, and we’ll come to this in a second. For now, let’s customize the language switcher to display language names without flags but keep the drop-down menu.
To do this, turn flags off and full language names on, click Save, then take a look at your site:

You may also want to carry out some advanced customizations. For example, let’s display the language switcher in the navigation menu or the sidebar.
You can display the Weglot language switcher in five places:
Weglot's switcher works with all WordPress themes, including FSE and block themes.
To control where your language switcher appears, head back to the Language switcher section in Weglot > Settings (shown above) and follow the link on the card for the placement you want. In this instance, we’ll go to Appearance > Menu and drag and drop the switcher to change the order of the items in the menu.
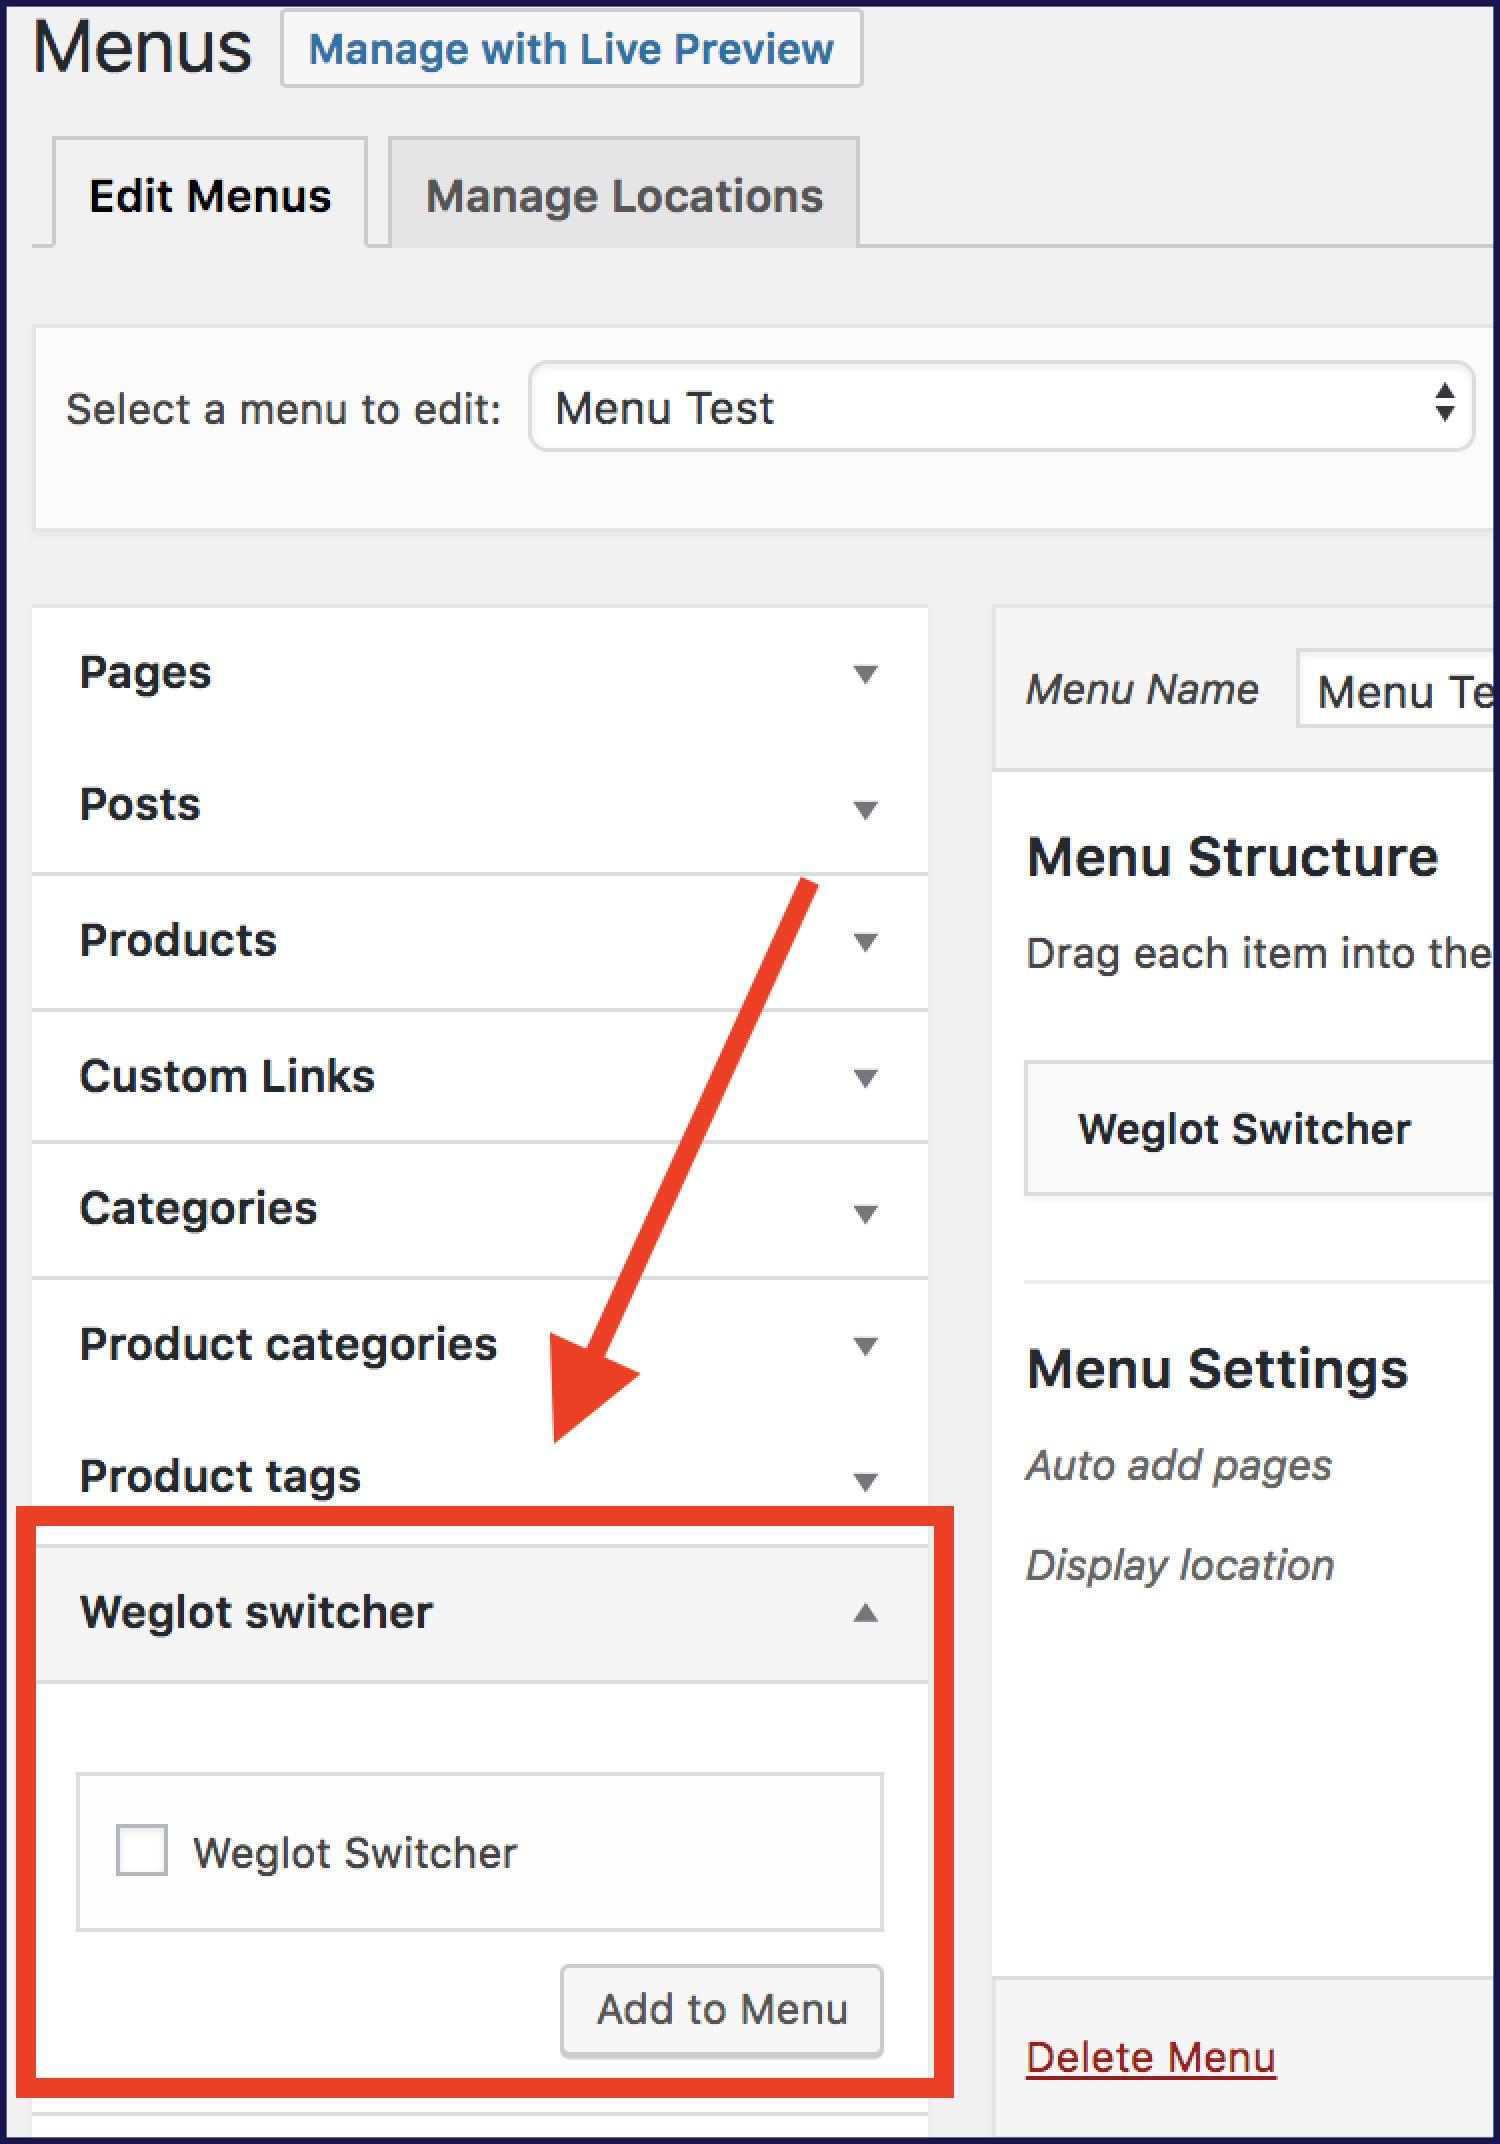
When you’re ready and have saved your changes, take a look at your front end once more:

While the language switcher is within the header, it’s not displaying in the right way. You could also use inline language codes, rather than a drop-down menu.
This is where you use CSS. In the Switcher Editor (more on it below), turn off the drop-down layout, display language codes instead of full names, and add a few selectors for your fonts, colors, and text weight so the switcher fits your site design. This is the result on the front end:

With the right placement and a few lines of CSS, you can quickly and easily style Weglot’s language switcher to match your site without the need for complex template editing, HTML, or PHP coding skills.
Note that custom CSS modifications are entirely optional. You can move and change the design through the ready-made options in the Switcher Editor.
To open it, go to Weglot’s Visual Editor and click the language switcher on your site. The Switcher Editor appears next to a live preview, so you see each change as you make it, and its Custom CSS panel (click Edit custom CSS to reveal the field) is where the selectors from the previous step go:
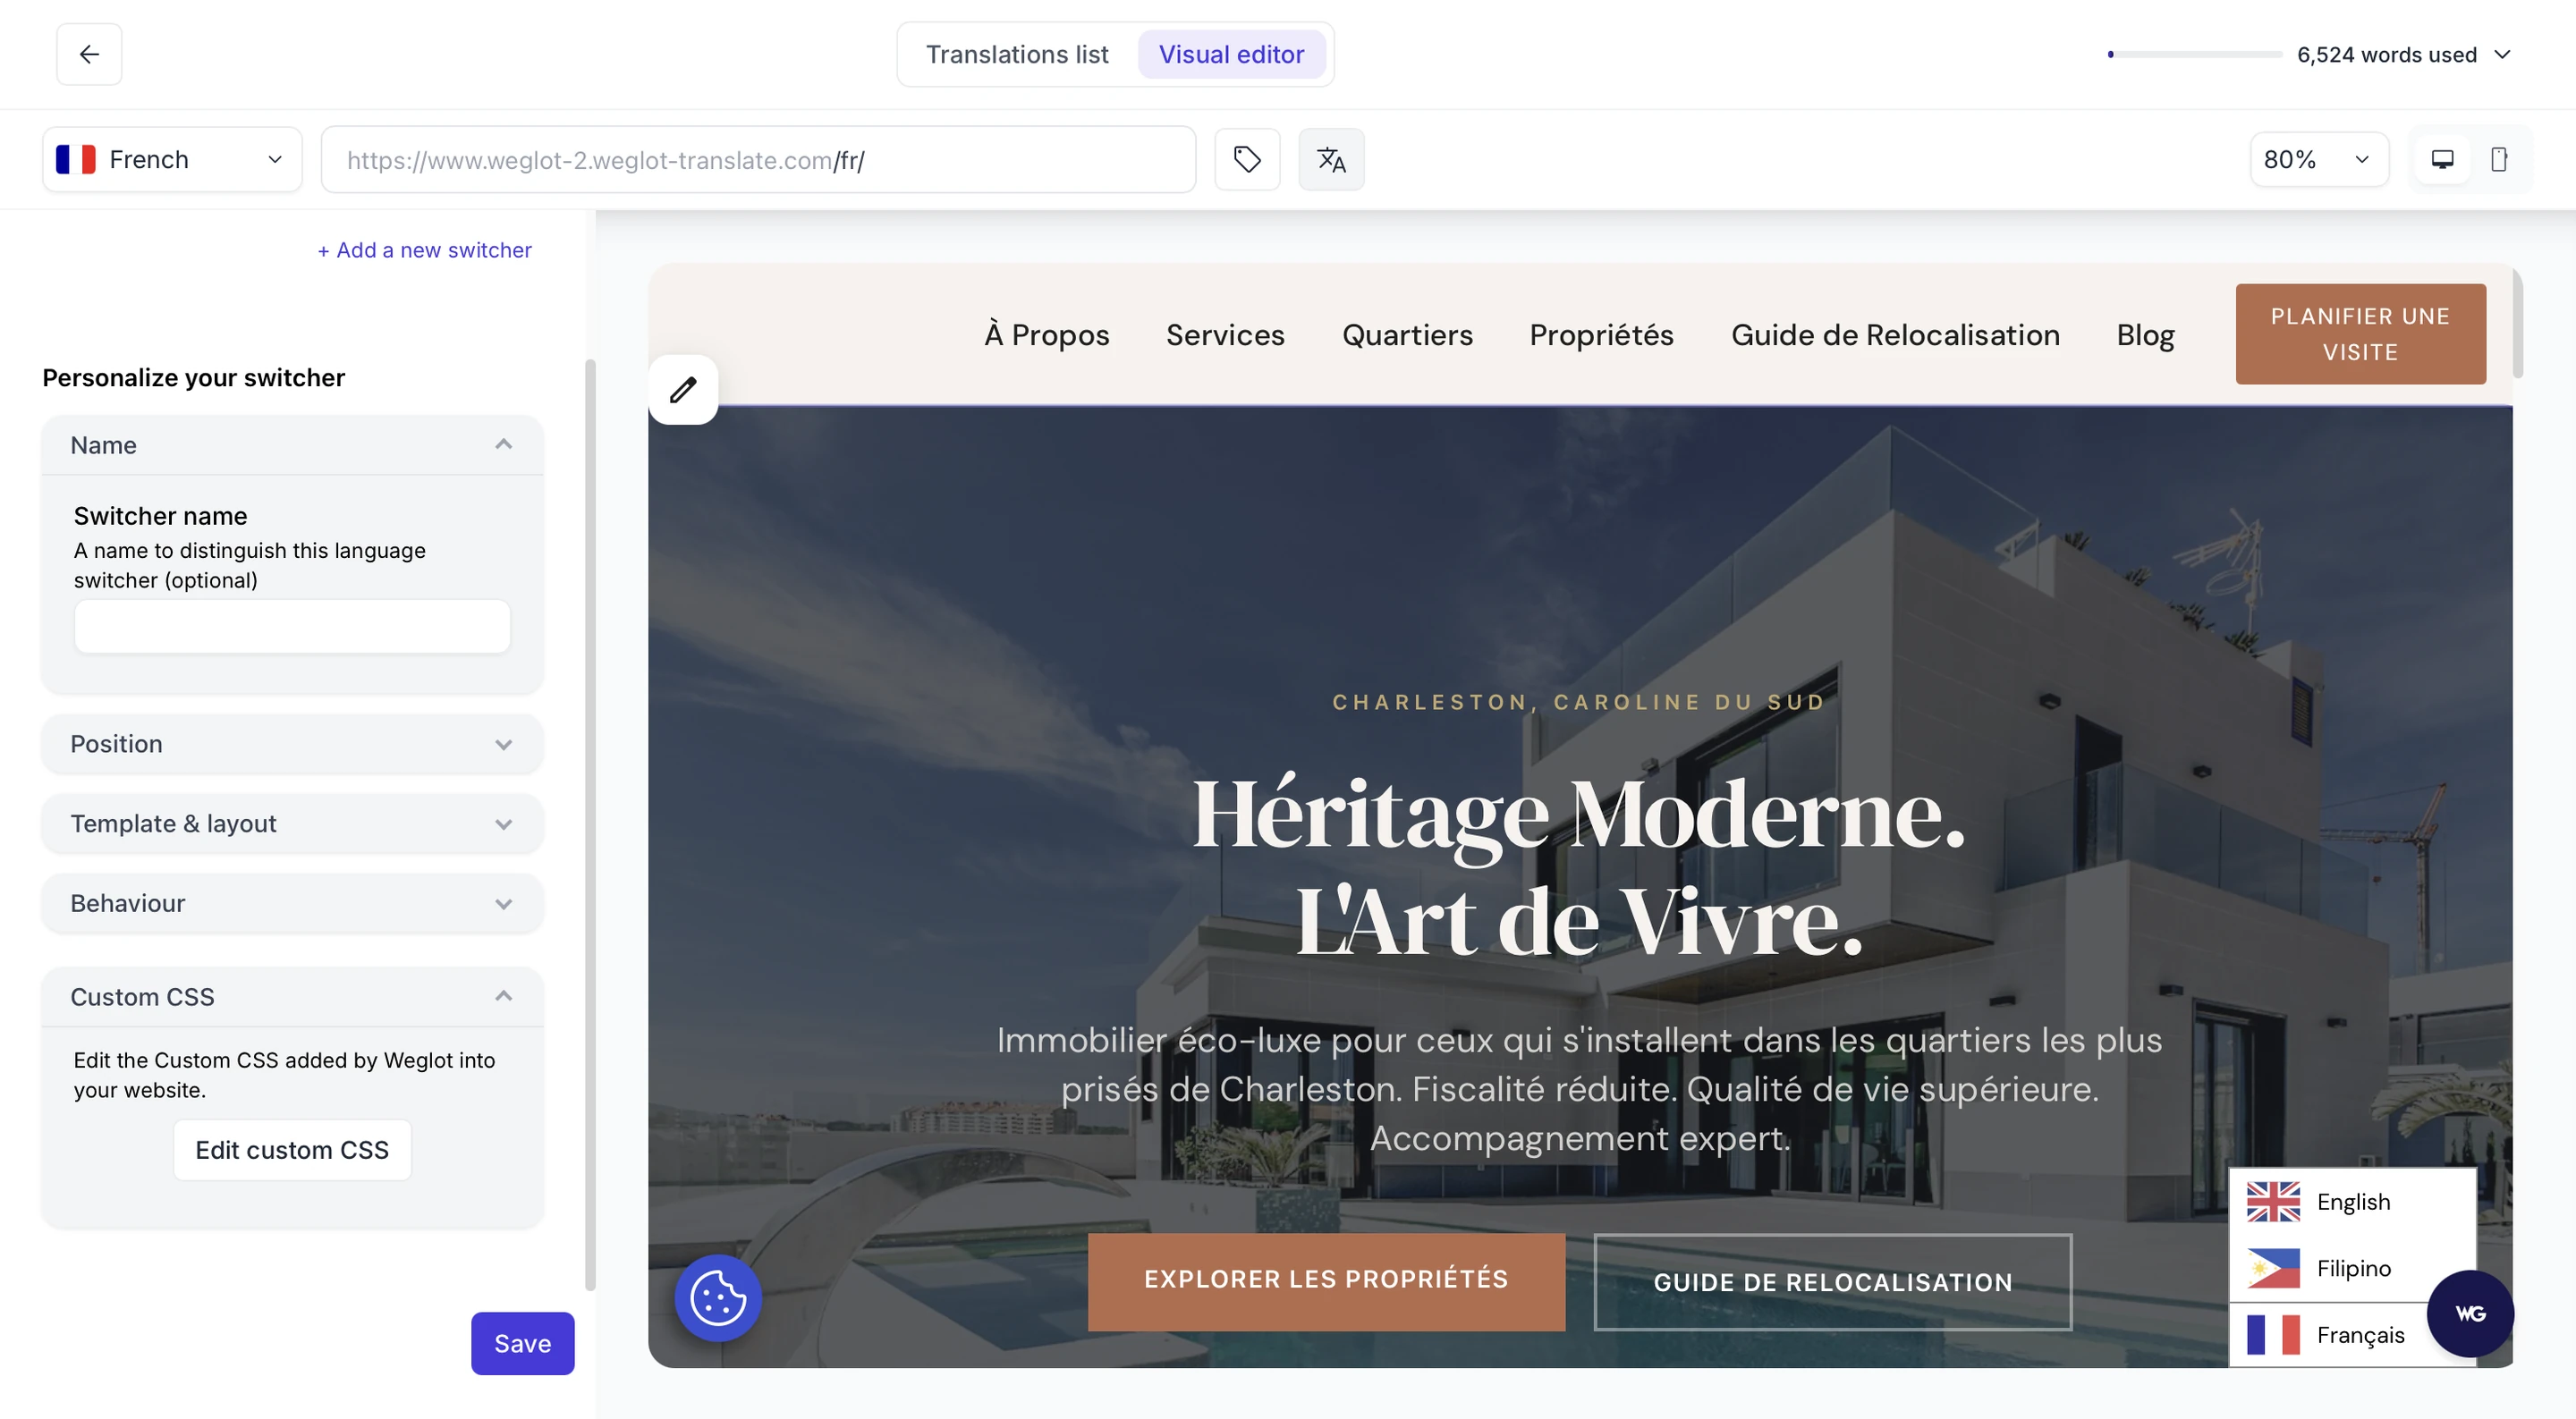
Set the position and layout from the panel, then click “Save” to make the changes live on your WordPress site.
Language switchers tend to fall into one of four camps:
As such, it’s crucial you make it easy for your site’s visitors to choose a preferred language and provide a user-friendly experience for your international site visitors. In an ideal world, you should be able to do this without the need for add-ons. With that in mind, consider the following:
Adding a WordPress language switcher to your site is simple with the right plugin. With Weglot, you get a language switcher added automatically, full AI translation from day one, Image Translation for the text inside your images, and complete editing control, no developer needed. The plugin runs in the background, keeping your brand-aligned translations up to date as your content changes. You can also enable auto-redirection from your Weglot Dashboard: it detects a visitor's browser language and automatically serves them the correct language version of your site.
Weglot is also built with multilingual SEO in mind. It automatically creates language subdirectories for each translated version of your site, adds hreflang tags, and translates your metadata, so search engines and AI-powered discovery experiences can find and index every language version from day one.
Choose a WordPress translation plugin that’s also built with multilingual SEO in mind. Thanks to automatically created language subdirectories, translated metadata, and hreflang tag implementation, Weglot handles the technical, SEO, and translation side of your multilingual site.
Ready to add a WordPress language switcher to your site? Get started with Weglot’s free plan, no credit card required.


Trusted by 110,000+ global brands


To add your language switcher in your WordPress menu, go to your WordPress Dashboard:
To integrate the switcher directly into a widget, again go to your WordPress Dashboard:
Yes. Once you’ve installed Weglot on your WordPress site, the placement is set in your WordPress Dashboard under Weglot > Settings > Language switcher: in a menu, in a widget, with a shortcode, or in the source code.
For the design, open the Visual Editor from your Weglot Dashboard and click the language switcher: the Switcher Editor opens with a live preview of your site, where you can toggle flags on or off, show language names or codes, switch between a drop-down and an inline layout, and adjust the position. If you want a specific design, there is also a Custom CSS field.
No. Once you’ve installed Weglot, there’s no need to ensure your theme will support the switcher. No matter what theme you’re currently using, Weglot’s language switcher is compatible.
Yes. You can hide the language switcher on specific pages by excluding those pages from translation in your Weglot Dashboard. When a page is excluded, it won’t be translated, and the language switcher will automatically stop displaying on that page.
To do this, open the Exclusions page of your Weglot Dashboard and add an exclusion rule for the URL you don’t want translated. The language switcher then stops showing on that page (the rule’s advanced settings let you keep it visible if you prefer).
This allows you to keep the language switcher visible only where multilingual content is relevant, without any custom code or theme changes.
The simplest way is to use a WordPress translation plugin. Many popular options, including Weglot, offer a free plan. With Weglot, you can translate up to 2,000 words into one language at no cost, with the same AI translations shaped by your Brand Voice as on every paid plan, which is perfect for smaller sites getting started. Need more? Just check our pricing page to find the plan that fits.
You can add a WordPress language switcher with Weglot in a few steps, no custom development required.
First, install and activate the Weglot WordPress plugin, then connect it using your Weglot API key. Once set up, Weglot translates your website with AI and adds a language switcher by default.
From there, you can easily customize the language switcher:
Weglot also ensures the language switcher links to SEO-friendly language-specific URLs, so users and search engines are both directed to the correct language version of each page.
In short, Weglot handles the technical setup for you; you just install the plugin, choose your languages, and place the switcher wherever it fits best on your WordPress site.

Reach new audiences in minutes without sacrificing your team’s time. Anyone can install it.