Switching Around on Squarespace: How to Design Your Language Button

So you’ve made your Squarespace site multilingual. Bravo, kudos, mabrouk—we love to see it!
Now what?
You may have noticed we’ve been chatty about Squarespace lately, and that’s because a ton of our clients are using it (even for e-commerce)—and doing a really great job.
The best Weglot-translated Squarespace sites we’ve seen are those who have kept on refining the micro-details of their sites, especially after asking “Now what.”
One of the benefits of using Weglot is the flexibility you have with your language-switch button design. As most web designers will tell you, having full control over the look and feel of imported elements—plugins, add-ons, or other app components—on a page is a rare luxury.
In a lot of cases, apps or plugins that you add to your site are pre-programmed to look a certain way and conform to the branding of the developers that made them. This makes it clear to the user that the plugin element isn’t native to the site, and came from somewhere else. Even if it’s a perfectly functional widget, it still may stand out visually from the rest of the site.
Weglot doesn’t work that way—or, at least, it doesn’t have to. When you install Weglot on your Squarespace site, you’ll initially see a language-switch button that looks like this, on the bottom right-hand corner of your page:


Pretty basic, right? The idea behind this phase-1 language-switcher is to be as neutral as possible: no loud colors, no wild typography, just a clear, clean-cut button that does what you need it to.
And a lot of people are fans of the functional look, which is perfectly okay. If the white rectangle suits you and your site, you know what they say (or maybe you don’t, but you’ll know now): “if it ain’t broke, don’t fix it.” (In French, we sometimes say “On ne change pas une équipe qui gagne”—that works, too.)
But if you’re looking at your nice, clean rectangle and still not simply basking in satisfaction, you needn’t lose hope.
Where should I put my button?
The whole concept of “button placement” might come off as trivial, but think about how many buttons you press per day. That includes keys on a smartphone keyboard, kids; it’s 2019 and our fingers probably come into contact with more buttons than they do with soap and water (gross, but true). The point is, buttons are everywhere.
And if making your site legible to every possible reader is a priority for you (which, quite objectively, it should be—especially if you’re looking to increase your conversion rate or just make your site more accessible worldwide), you’ll want to make sure they can instantly switch it into their own language.
Side matters.
Yes, you read that correctly. Sure, size also matters—a miniscule button is unlikely to be particularly visible, and therefore even less likely to get clicked.
But web design is a fundamentally spatial puzzle, and, if we’re thinking of it as a game, your playing board is limited to a 2-dimensional rectangle with two main axes—left-right and top-bottom, or “x” and “y,” if you prefer—and the whole point of a website is that it can contain a lot of information. How can you fit all of your links, images, videos, and other fun interactive elements into this constrained space—and make the most important ones stand out without taking away from the others?
There’s research to support that the placement of an element on a page—how far along each axis it ends up—critically affects how quickly viewers are to locate it, as well as how likely they are to interact with it. These two conditions are not necessarily causally linked, but they’re pretty correlated—enough to make it worth considering the inherent preferences of users with regard to call-to-action (“CTA”) or button placement.
So what exactly does the research say, you may ask?
Somewhat unsurprisingly, the user’s native language—or, at least, the language they’re most accustomed to browsing the web in—has a pretty important impact on how they interact with webpages.
The UI-UX design experts at Material Design released an in-depth guide about which webpage elements should be adjusted (and which ones shouldn’t) between languages that read left-to-right (“LTR”—like English, for one) and right-to-left (“RTL”, like Arabic or Hebrew).
We won’t go into quite as much detail as they do, but you can check it out here if you’ve got more complex visual elements—icons, for example—than just buttons to adjust for language direction.
That being said, there are concrete psychological explanations behind why the direction we’re used to reading in affects our susceptibility to CTAs in different places—one of which, called the Gutenberg diagram, illustrates the relationship between the order in which we look at elements on a page and how much time we spend on each one.
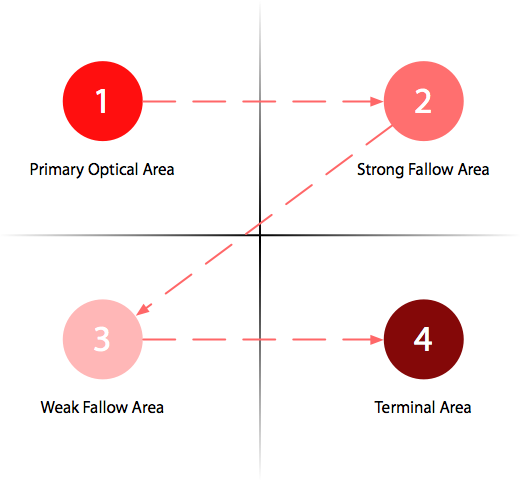
There are lots of other resources on the web that explain this phenomenon in detail—like this one, for instance—but suffice it to say that our decision here at Weglot to place your language-switcher button by default in the lower-right hand corner of the page wasn’t by accident. On a two-dimensional screen, this placement constitutes the terminal area, where a user reading LTR is incredibly likely to rest their eyes and interact with the CTA presented to them. If the CTA in question is a language-switcher button, this means they’ll have little trouble finding a way to make your site accessible to them.
All in all, the side of the page on which you place your button has a big effect on how easily users will be able to find it. If your site’s initial language is in LTR format (like English, French, Spanish, simplified Chinese…), this implies keeping your button towards the right side of the page.
Of course, if you’re building your initial site in a RTL language—like Arabic, Hebrew, or Farsi—you’ll want to do the opposite, and keep that button on the left side.
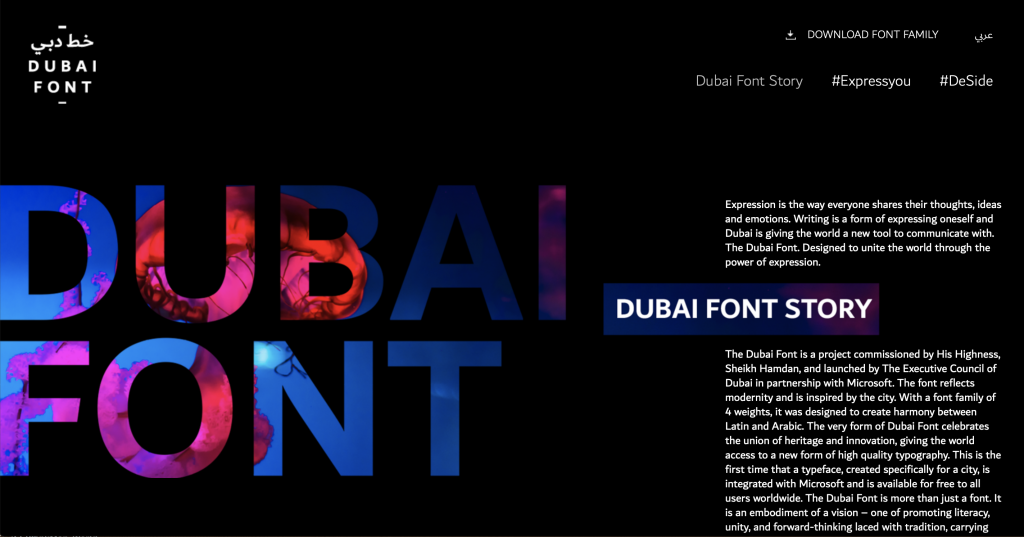
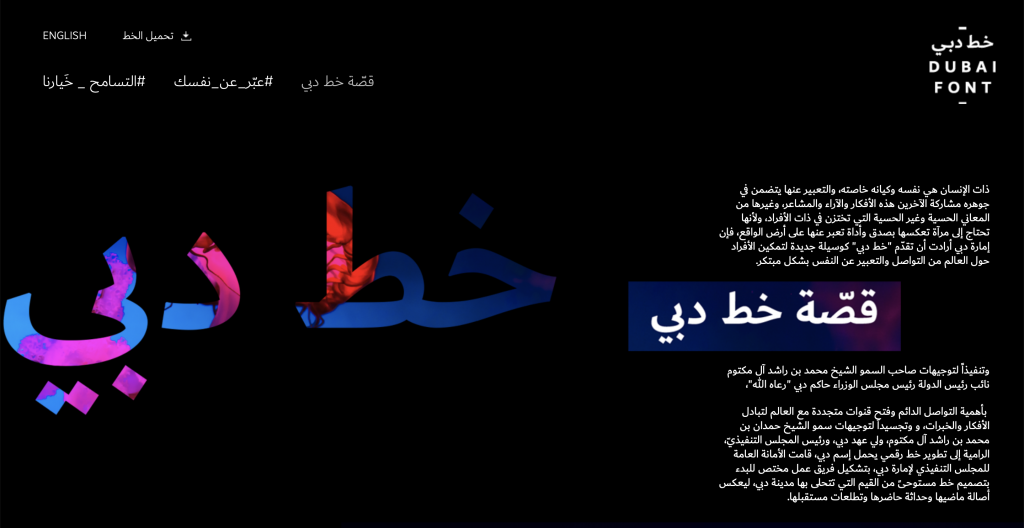
The Dubai Font website provides a perfect example of what this organization should look like—for both English, the default language of the homepage, and Arabic, the language you can select via the button at the top right of the English-language page. Notice how this directionality changes when the language does.
But can I see the menu, please?
You may still be thinking, why not put it in the “Primary Optical Area” zone instead? —and this is a valid question.
Remember that this is still your website for, presumably, your brand or other project—so you’ll probably want to reserve this section for some kind of impactful personal identifier, like a logo.
However, the strong fallow area is, like the terminal area, a good candidate for button placement—especially if you have a horizontal menu on top of your page (which is the case for…well, most websites these days).
Top menu bars are pretty good places for language-switch buttons, in the end—and particularly on Squarespace.
Menu buttons on Squarespace: Stylize, synthesize, & localize
Integrating the Weglot language-switch button into a menu bar on Squarespace (and this applies to any kind of menu bar, no matter what side—so your language directionality doesn’t affect how this works) is super easy.
In your site editor, you can click on “Pages,” which will lead you to a sidebar that looks something like the following:
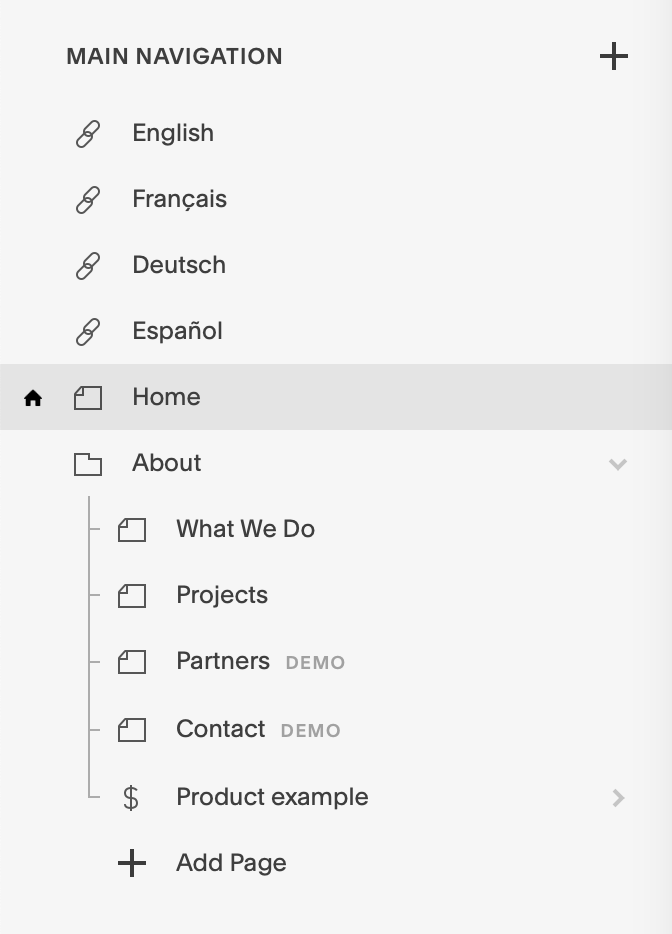
By clicking on the “+” sign next to the “Main Navigation” title, you’ll be able to add links and/or dropdown menus to your main header menu.
Whether you choose to include your site’s available languages as direct options on the main menu…

…or, rather, as elements of an integrated drop-down menu…

…you’re in good hands: the process is the same. If you create a drop-down menu, you’ll also be able to add links (like with the “+” command on the main navigation menu)—and the following process to each language that you’ve added to your site.
Once you’ve opted to add a link, either to your main menu bar or to an integrated drop-down menu, you’ll see a pop-up that looks like this:
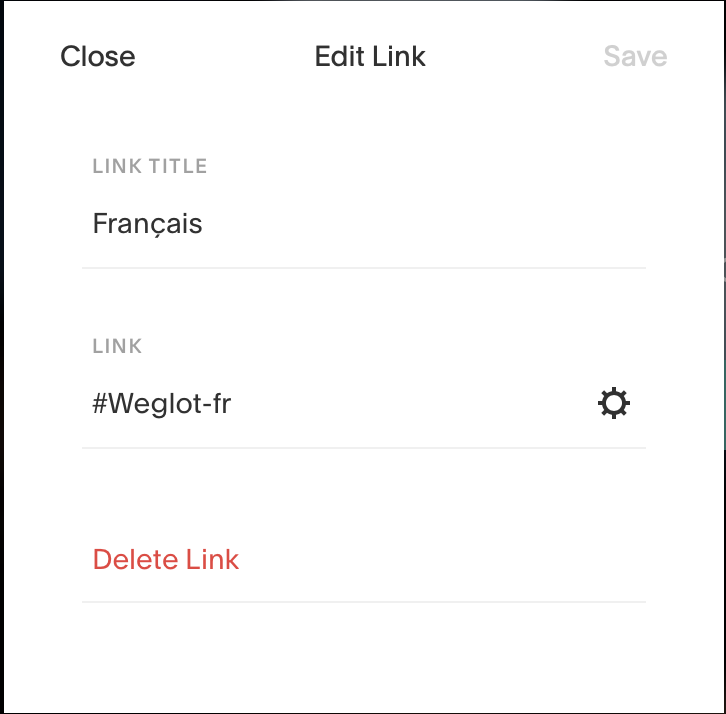
Title the link as the name of the language you’d like it to change your site to. You can, of course, call the language by its name in your original language—so, for example, “Spanish” as opposed to “Español” if you’re building your original site in English—but we recommend that you put the language’s native name as its title, so that its speakers will more easily be able to recognize it. Tl;dr: opt for “Español” as opposed to “Spanish”; “Français” as opposed to “French”; et cetera, et cetera.
Next, you’ll have to enter the link that you’d like this title to lead to. Since your Weglot-translated Squarespace site doesn’t consist of duplicated pages in subfolders, but rather of individual subdomains for each language, you won’t actually be linking out to a separate URL. Instead, enter the string “#Weglot-” followed by the two-letter ISO language code for the language you’re working on (we’ve got a full list of those here).
Once you’ve got this out of the way, you’ll see your language titles perfectly integrated into your main menu…
…Like these guys.
Your multilingual Squarespace site is basically guaranteed to be sleek and good-looking—that’s the nature of Squarespace templates, which make it easy as click-and-drag to polish up your site and have it looking pro.
Of course, that shouldn’t prevent you from trying to personalize your site’s look and really make it your own.
With a multilingual site, it’s especially important to keep your personal branding elements coherent across versions—this is one of the basic principles of multilingual site design—and this means synthesizing your site aesthetic, from image color palettes, to typography style, to button style. Your language-switch button is a key part of this whole schema, and your site will only be more beautiful if your button fits in with the overall visual theme of the page.
At the same time, as we’ve already gone over, you want your button to stand out at least a little bit from other page elements so that it’s easy for users to find, fast. How can you achieve a balance between distinctiveness—for findability—and coherence, for page quality?
This is a literal paradox, but it’s not an unsolvable one. Here are some multilingual Squarespace sites to inspire you with their creatively-placed and -designed language-switch buttons.
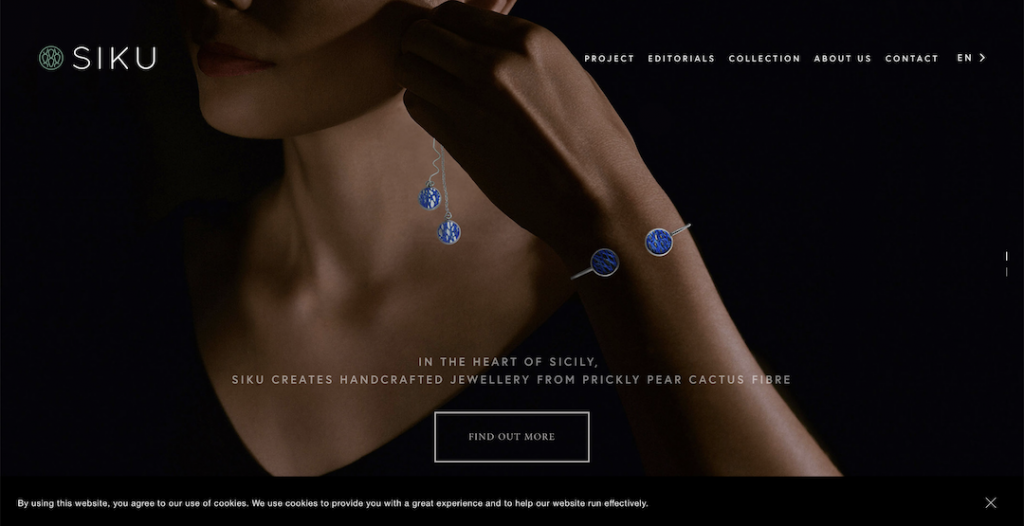
The Siku Project
Based in Sicily, the Siku Project is an innovative jewelry company whose pieces are made from the fibers of the local Italian prickly pear cactus (yeah, you read that right—prickly pear cactus fiber can actually be used to make an eco-friendly hard material), and their bilingual website is as sleek as their jewelry pieces.
Their language-switch dropdown menu, which allows you to float between English and Italian, is perched on their main navigation menu at the top-right hand side of the page, like a pearl on a (highly visually-accessible) string.

Expedition Swim
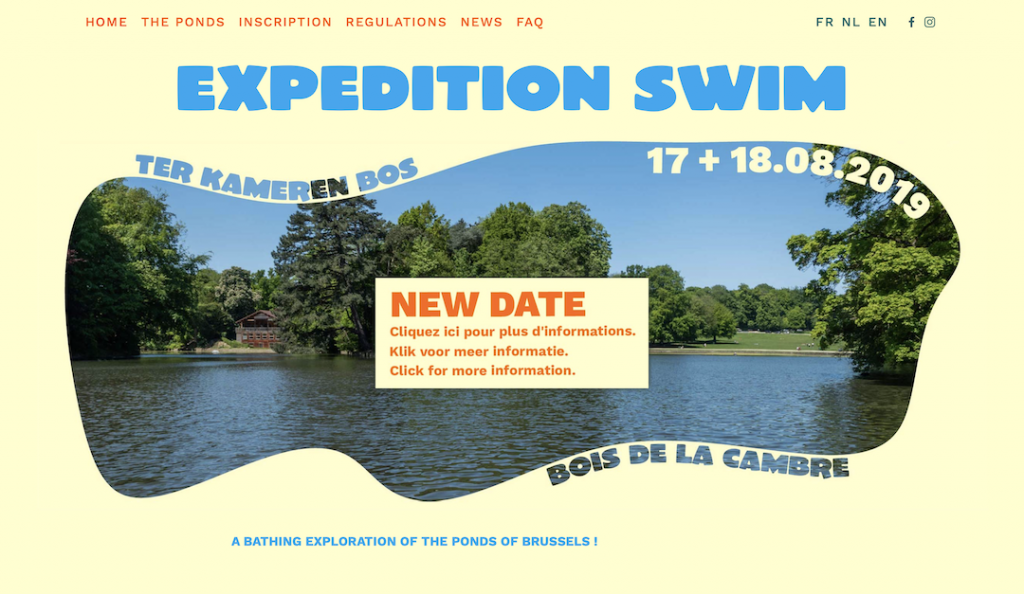
The Siku Project website looks like what a lot of us probably imagine Squarespace sites to look like—it’s monochrome, image-heavy, and clean. But Squarespace sites can also be colorful and wacky—that’s the way Brussels’s Expedition Swim project chose to go (or, rather, swim).
Their site’s goal is to hype up locals to bring their families swimming in the city’s newly-cleaned ponds. It’s playful, bright, and full of wavy shapes and animations (which evokes—you guessed it—water), and their language-switcher fits perfectly into the top right part of their nav bar.
They’ve made it super-user-friendly by showing their three languages—French, English, and Dutch—by their respective universally recognizable two-letter language codes (FR, EN, and NL), no dropdown click required. Every bruxellois, down to the youngsters, looking for a cool summer activity will easily be able to figure out, in two seconds, how to switch the site to their own language.

SalesCandy
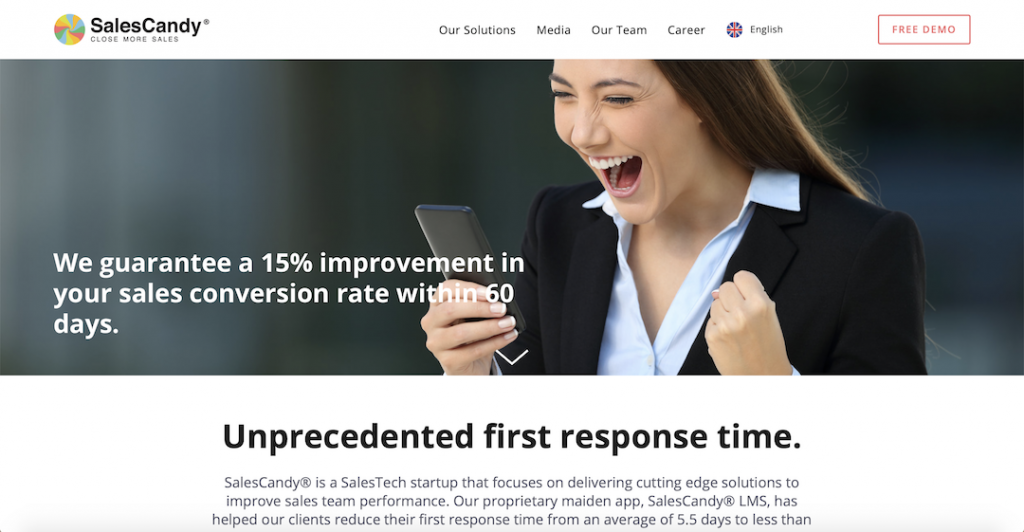
Saas startup SalesCandy is based in Malaysia, a fundamentally multicultural—and inherently multilingual—society. Having a multilingual site is an absolute necessity in this kind of business environment, and SalesCandy has put some forethought into facilitating every reader’s access to their native language.
How have they done this? Two things in particular: a) their language dropdown menu is (yes, we really cannot stress this enough) nicely situated on the right-hand side of the page, and b) the language options are written natively—that is to say, like so:

Feeling inspired?
We certainly hope so. If you’re ready to launch your Squarespace site or store and optimize it for your polyglot audience, here are some tips on how to start your design process and, once you’ve ironed out the details, how to go global on Squarespace.


