

Website Language Selector: Tips, Best Practices, & Examples

When you have a multilingual site, you’ll want to have a language selector (sometimes called a language switcher) on your website. This lets your visitors see which translated site versions you offer, so they can pick their preferred language.
A language selector looks like this screenshot:
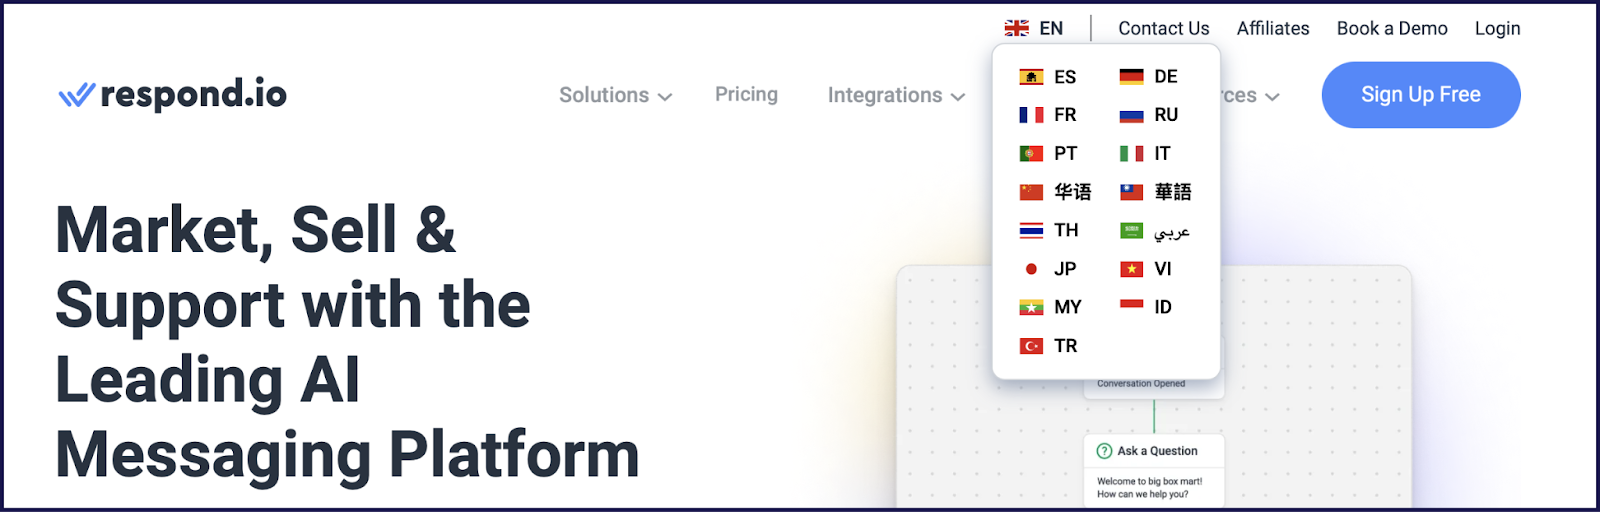
But there’s some variety of how it’s displayed, including where your language selector is located (header, footer, etc.) and whether there are icons that display country flags.
The good news is that adding a language selector doesn’t have to be difficult. We’ll discuss what’s involved when designing and developing your own language selector tool from scratch. Plus, an easier solution: translation software or plugins that come with a built-in (and customizable) language selector (also very helpful for website localization).
In this post, we look at the different kinds of language switchers, some best practices for keeping your language switcher highly visible and functional, and a simple way to add and design your language selector on your multilingual website.
Let’s get started!
Adding Your Website’s Language Selector (Tips & Best Practices)
If you already have a multilingual site, and you just need to add a language selector, then you might have a designer mock-up of a design that your developer can create. Here are some tips to help you with the overall user experience:
Make It Easy to Find
When a non-native speaker lands on your English website, they’re likely to look at the main navigational areas (header, footer) to see if you have your site available in their language.

But if they don’t see language options, they’ll assume your site is only in English, and they’ll bounce right off. This hurts your business. So, a best practice is to know where your visitors will be looking for a language selector and to put it there, whether at the top with your navigation menu, the bottom of the page, the sidebar, or a pop-up modal.
Consider How Many Language Versions You Plan to Offer
For example, you may not want to do a drop-down menu if you’re only going to translate your site into one other language. However, if you have plans to translate it into three, four, or even more different languages, then a drop-down menu will look cleaner and offer more usability.
Prioritize Function Over Form
Yes, you want your language selector to fit in with your site’s design. But don’t forget the point of this design is functionality.
You don’t want to confuse visitors—you want it very clear that your site is available in other languages. You also want to make language switching as effortless as possible.
Again, designing and developing your own language button makes sense if you have a multilingual site and you’re not planning on using software to manage your translations.
But if you’re using translation software, then it’s not necessary. This is because most website translation software will let you add a language selector. (We recommend using translation software to translate your site and keep translations up-to-date.)
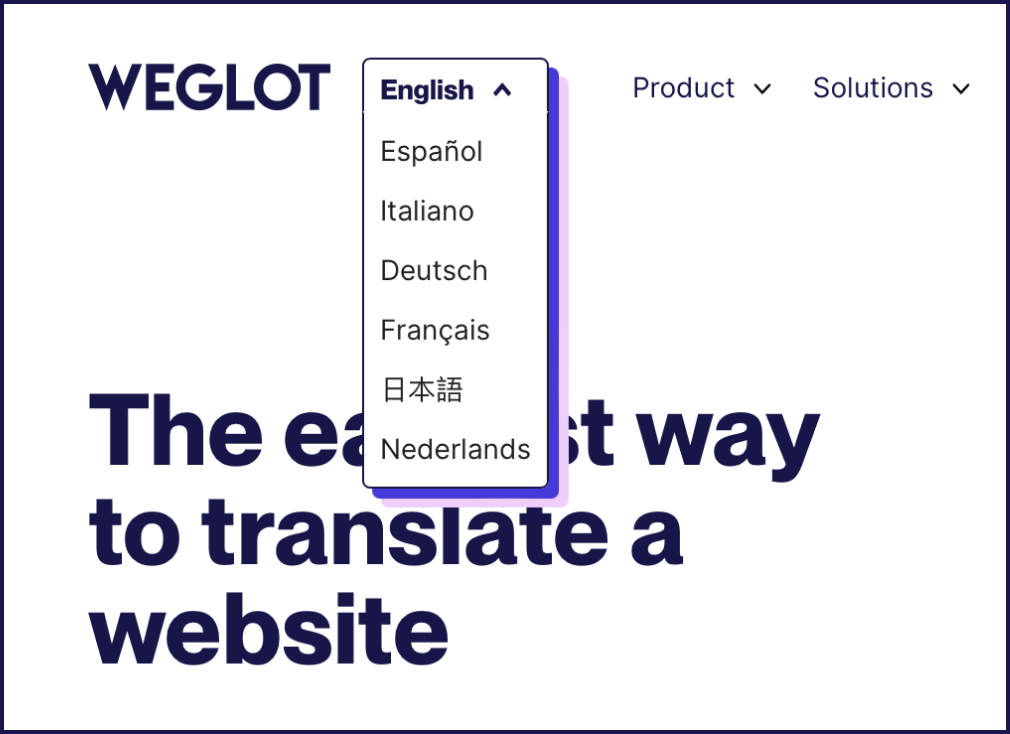
List Languages in Their Native Form
Without realizing it, you may have unknowingly listed the languages on your website in your native language. If your site is in English, that means you’ve written down German, Chinese, Spanish, and so on in your language selector.
However, this is counterintuitive to your audience. The native name of the language may be completely different from the English one!
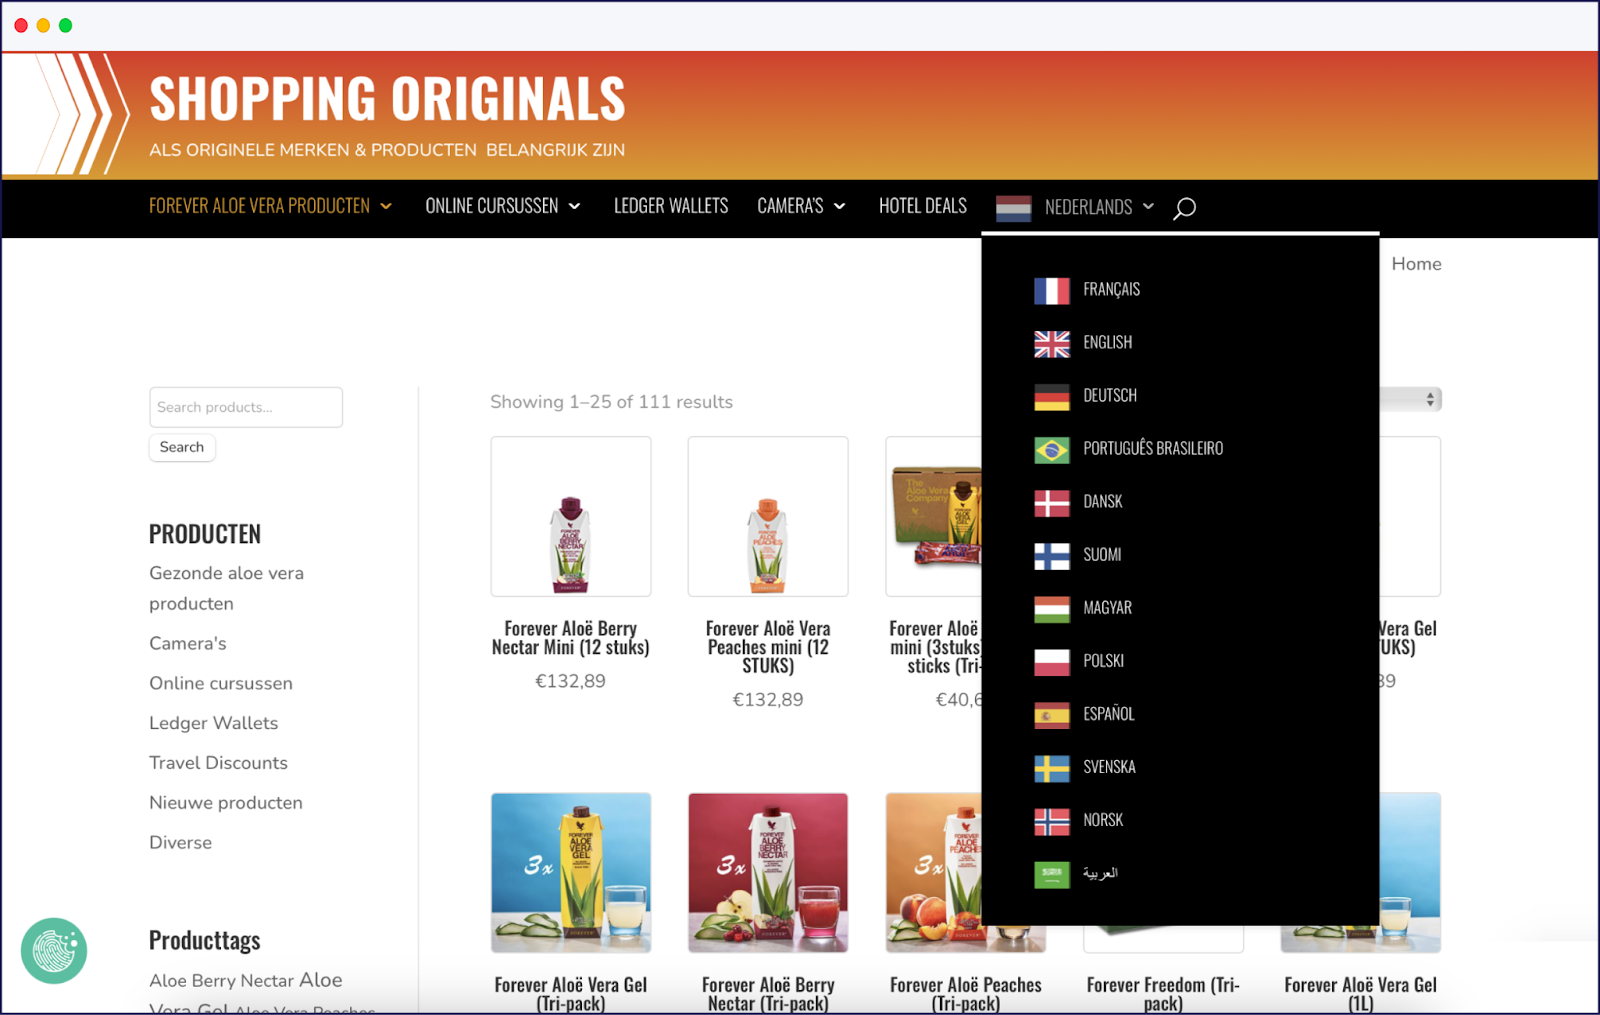
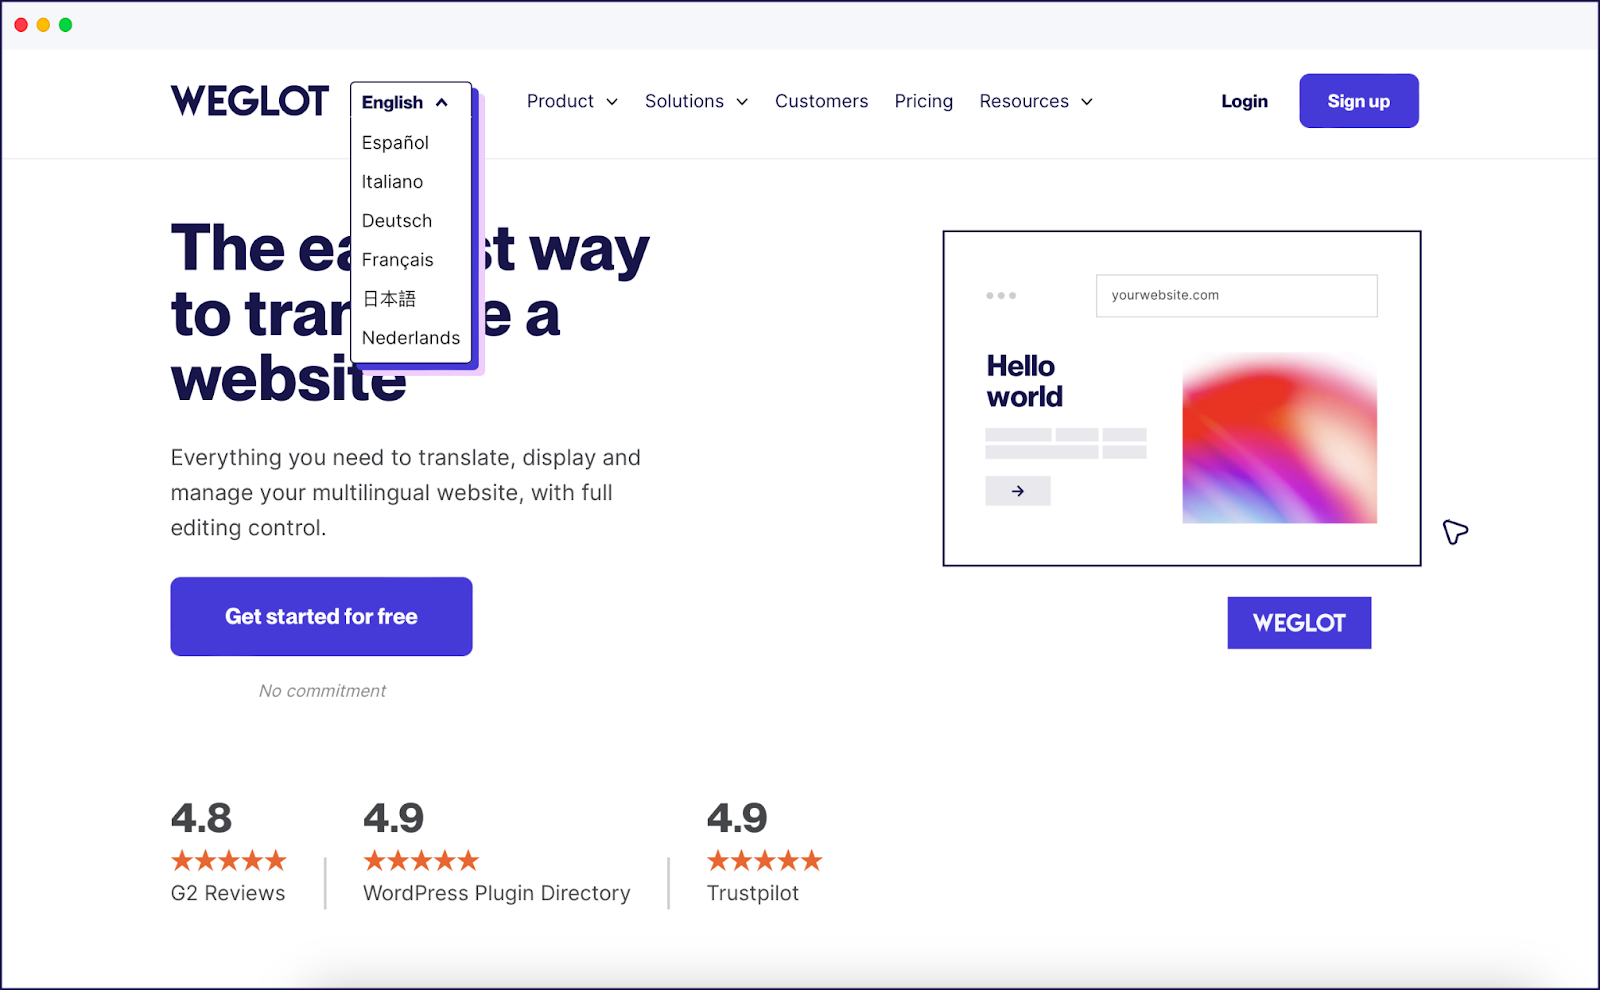
Case in point: our language switcher, lists options as Français, Deutsch, Español, Italiano, 日本語 for Japanese, and Nederlands. That way, native speakers can easily locate their preferred site language.
Using Flag Icons May Not Be the Best Choice
It’s common to think that a flag is a nice visual representation of a language, but that’s not the whole story.
What we mean by this: in the United States, English is associated with the American flag, not the Union Jack. Brazilians associate Portuguese with the Brazilian flag, not Portugal’s flag. The same for Spanish speakers in Spain—they’ll associate their language with the Spanish flag, not the Mexican one.
You can, of course, use flags. They do look nice in terms of UX design since they’re more striking, thus easier to find, and they can work for your use case. It just depends on who your target audience is, as you may risk alienating a segment of them.
Use Redirects With Caution
One way to approach website language selection is to auto-redirect users according to their location (using their IP) or browser language. The latter works by the website detecting your user’s browser language and immediately rerouting your visitor to that language version.
While this is convenient, it isn’t always a good idea to rely on automatic redirection. That’s because a user’s location doesn’t necessarily correspond to their language: imagine a Chinese tourist on a month-long holiday in Spain. They’d undoubtedly feel confused when they’re immediately brought to the Spanish version of the website they’re looking at!
And, even if their browser language is set to Danish, for example, it doesn’t necessarily mean they want to ship physical orders to an address in Denmark, either.
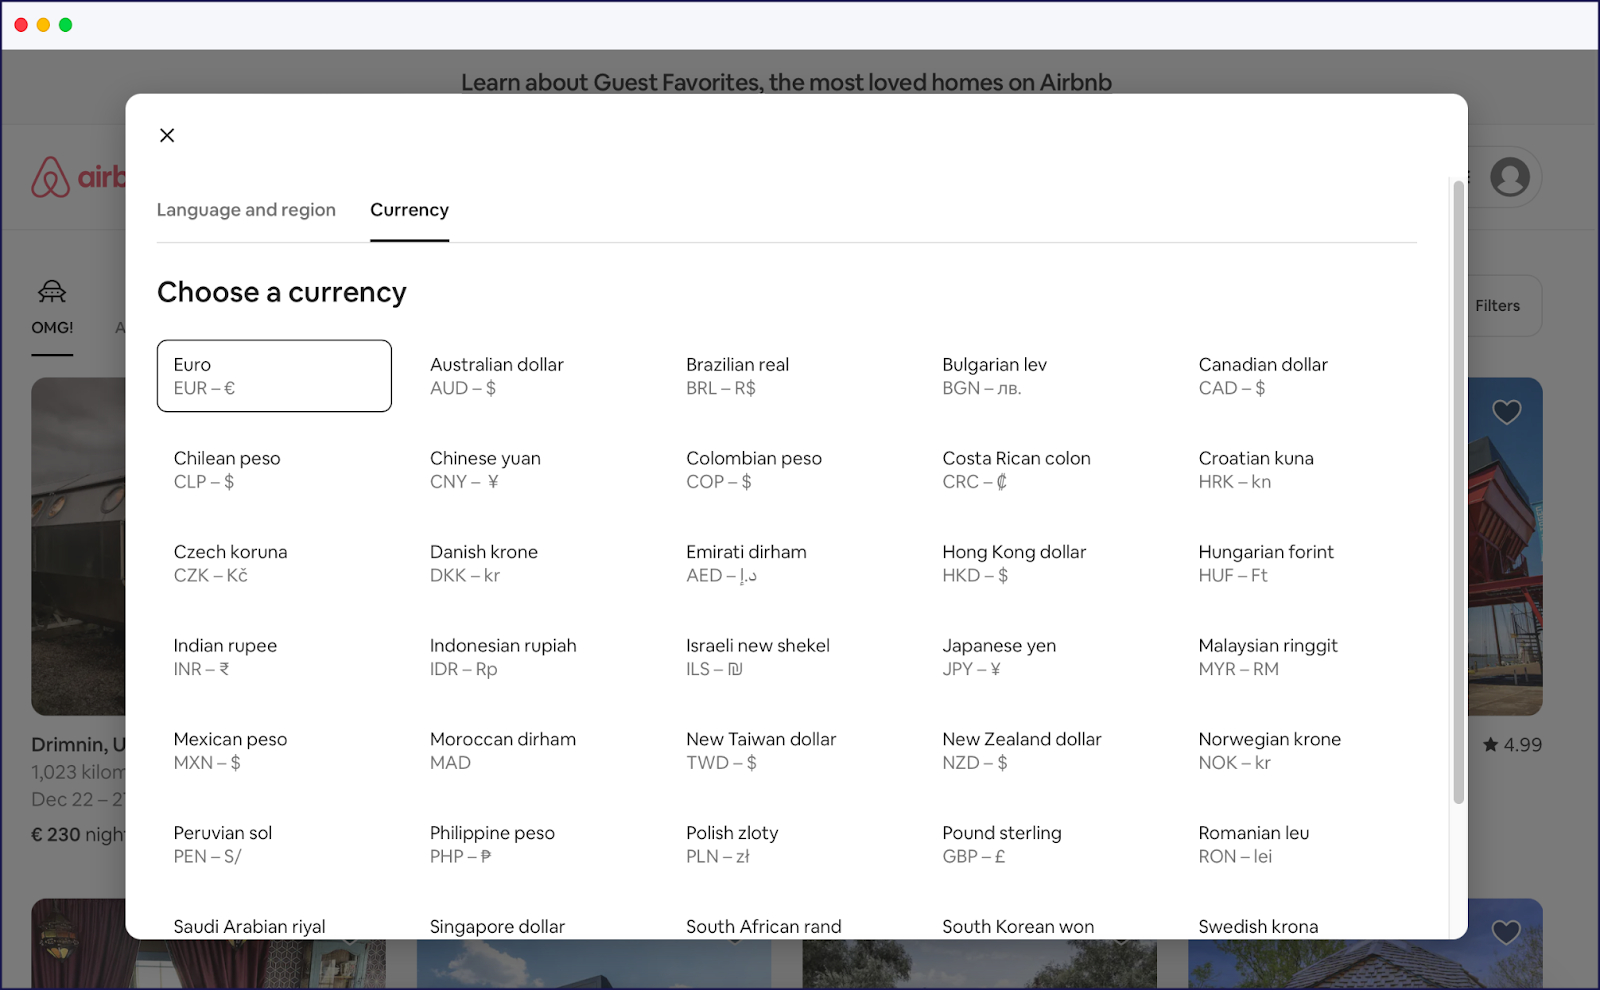
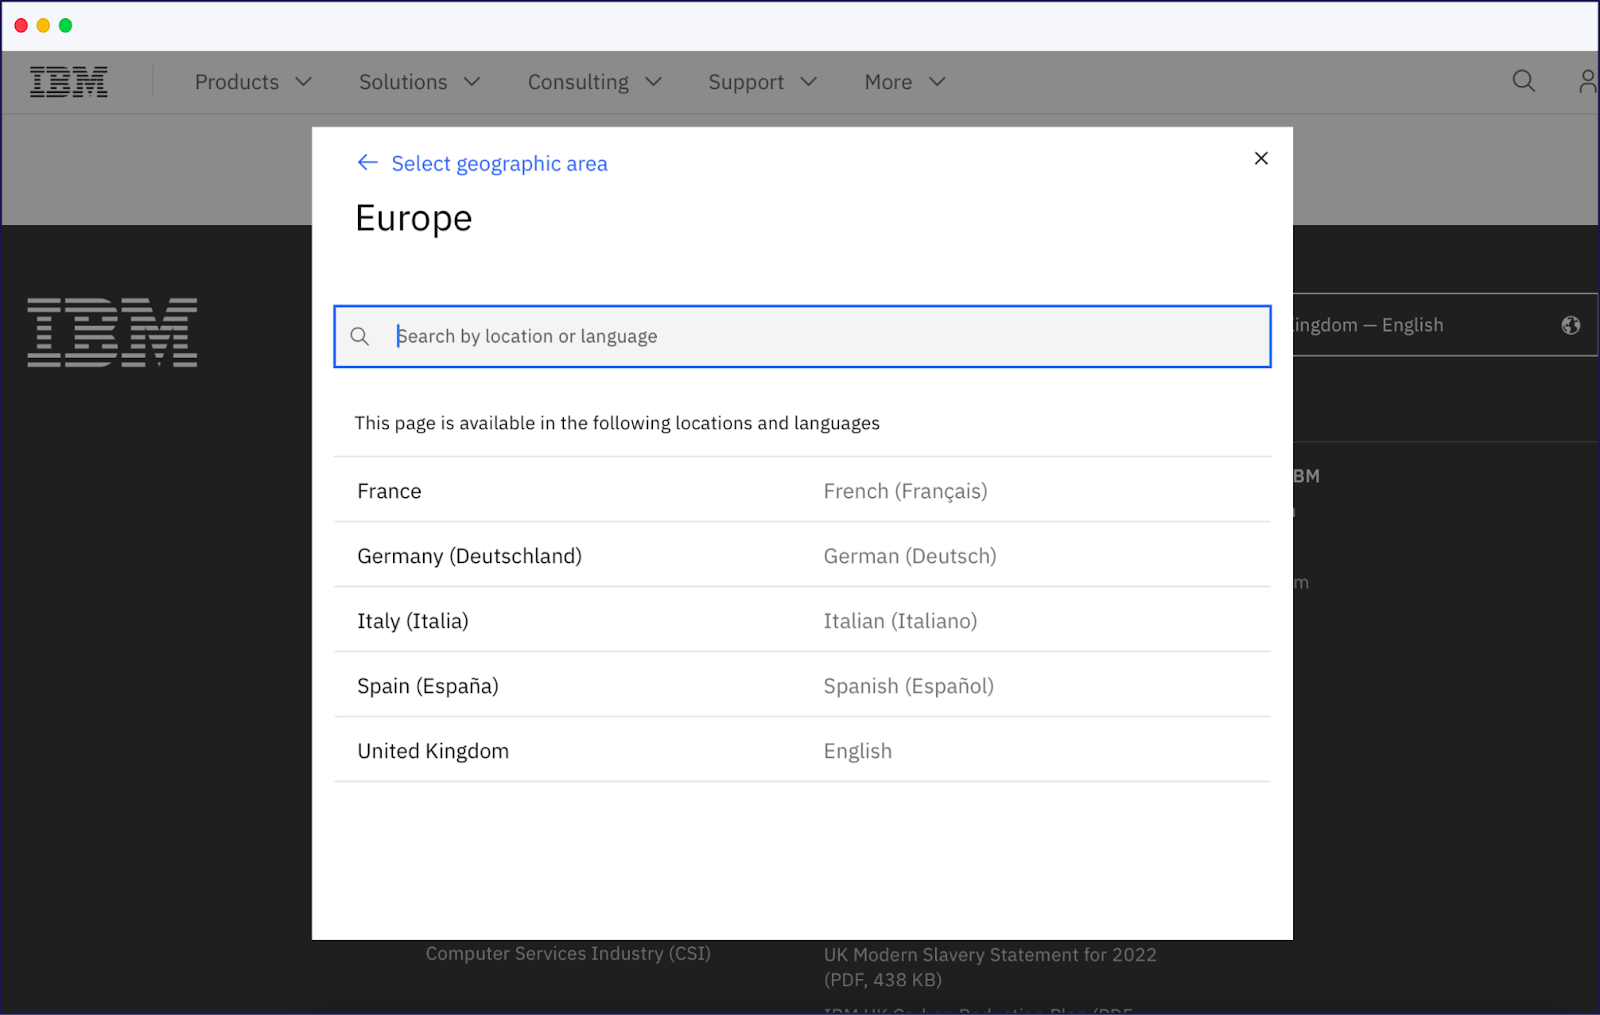
In short, it’s typically best to ask for your user’s preferences instead of assuming the intent. A user should be able to choose their location, default language, and currency. Airbnb is a great example of this; they don’t assume you speak the languages of the country you’re in. By clicking on the globe icon, you’ll get to choose your language, location, and on the next tab, your currency:

That isn’t to say that redirects are never a good idea; it makes sense when a French user in France accidentally lands in the US version of a website, for example.
But, there are some websites that have done automated language selection the right way. For instance, Zara offers the option to stay on the United Kingdom site or to proceed to the French website:
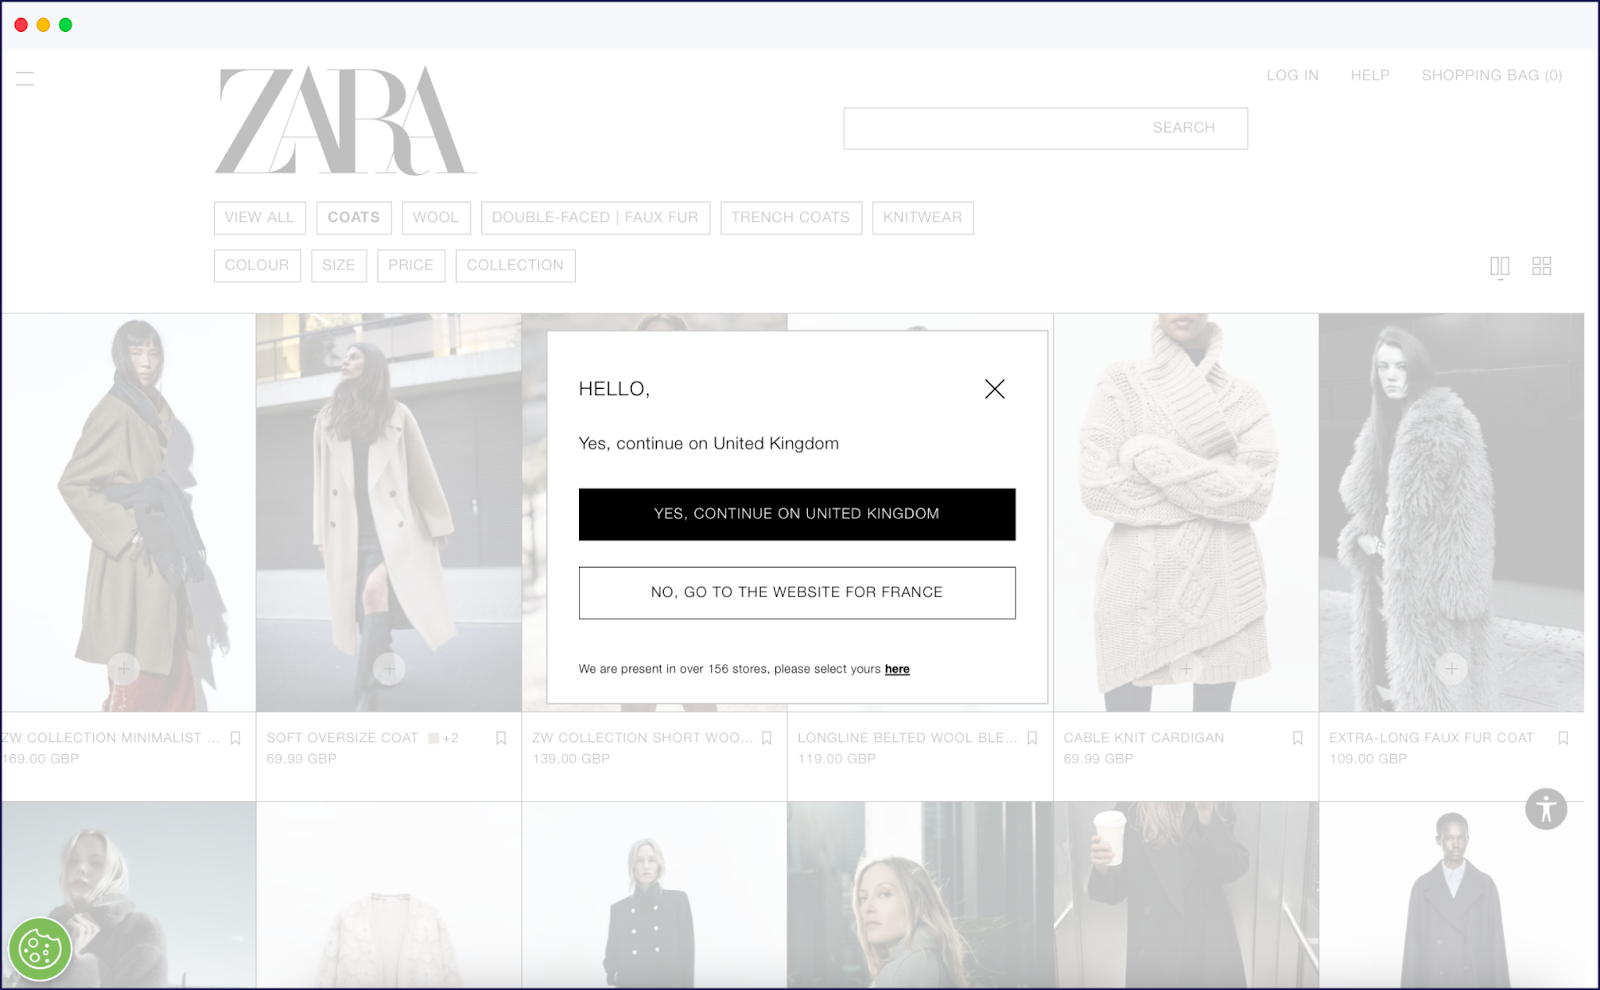
This comes in handy for several search intents, such as checking the availability or details of a product on an ecommerce site in a location you’re traveling to.
Where Possible, Use Autocomplete
It’s always a good idea to have autocomplete in your dropdown menus, where the website suggests the language you’re trying to find when you type the first few letters.
Autocomplete is especially helpful if you offer enough languages that your user will have to scroll down to find theirs. That way, it will only take them a few seconds to toggle their selected language.
Designing Your Website Language Selectors
There are many different ways to go about designing your website language selector. Many people opt for simple buttons, while others prefer a little more flair by adding their branding to it (like ours!).
Dropdown or Selection Menus
This is one of the most common ways to display your website’s available language versions. Dropdowns, or selection menus, are characterized by the list of options fanning out, showcasing you all the available language settings to choose from. They’re also clearly marked, whether through a globe icon, the name of the language, a flag, or an abbreviation of the language.
If you’re looking for a quick and easy language selector, this one will work best, as there are many different ways to design it. It’s designed to be highly visible, so it’s usually found at the top of the page, like you can see here:
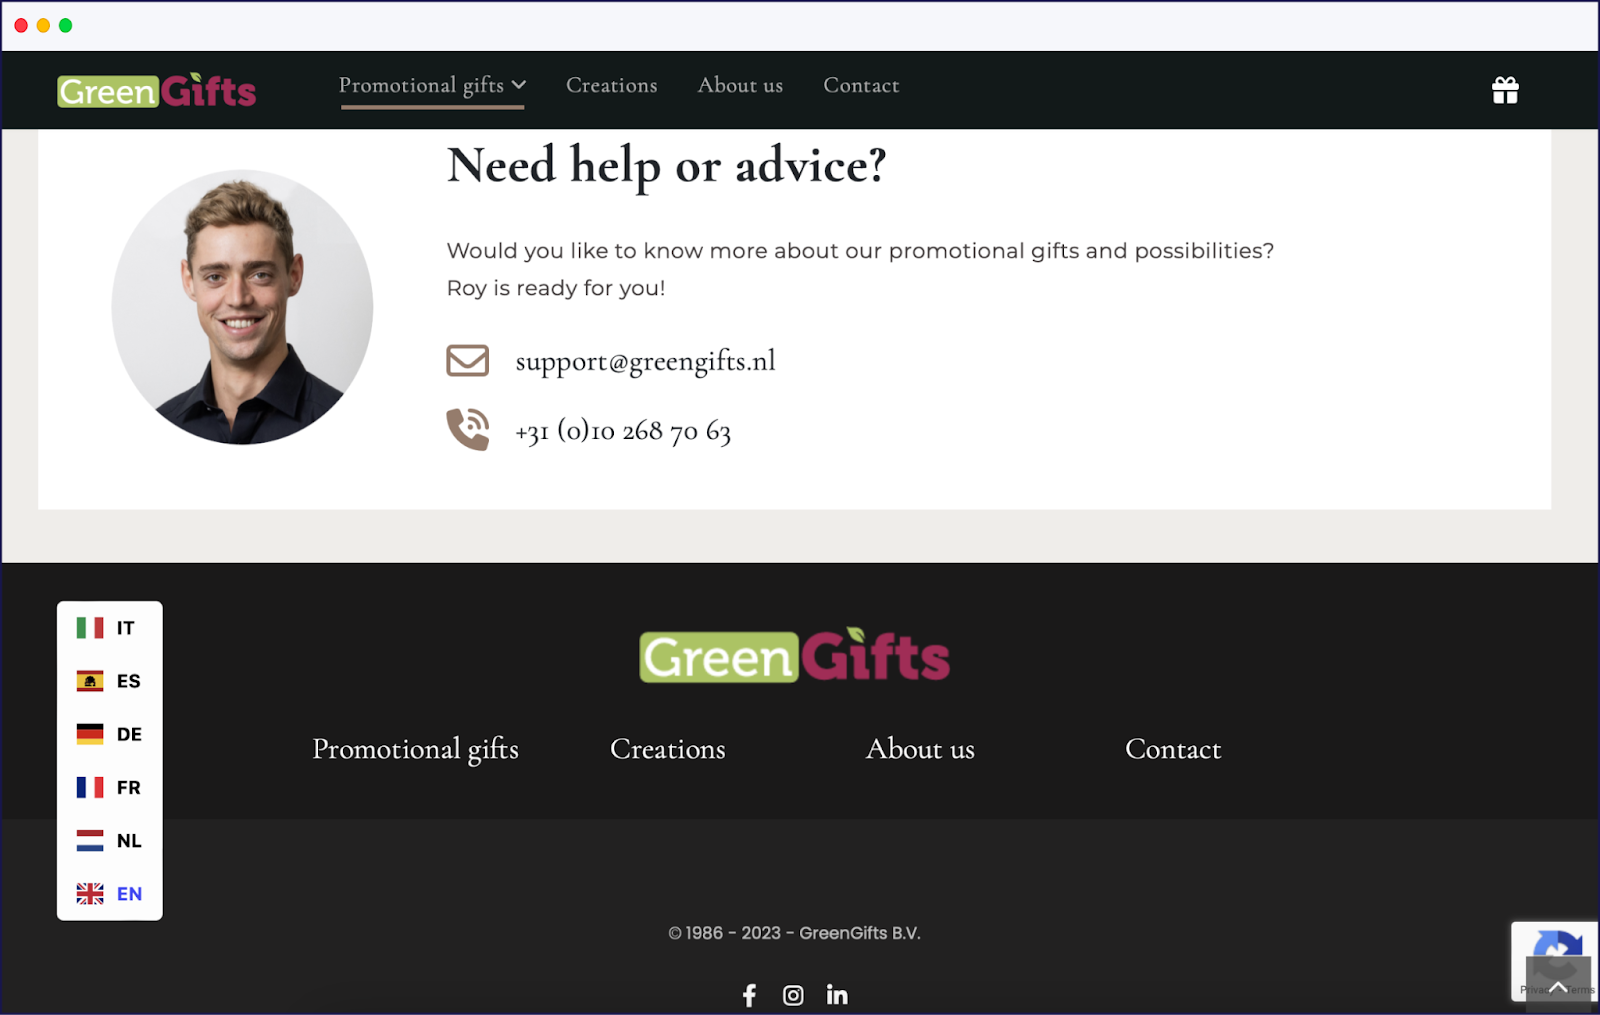
Some websites opt for a less orthodox method, with a sort of drop-up menu, like this website selector on Green Gifts:
MINI’s website shows a language selector that displays other languages to the left of the current language when you hover over it. Just like Green Gifts, it uses country codes to denote each language:

Buttons
Language buttons are a distinct and quick way to show that you’re targeting specific markets. They work best when you’re offering only a few languages on your website since they take up considerably more space.
Gardette Industries offers their website in only French and English, so a language button here makes sense:
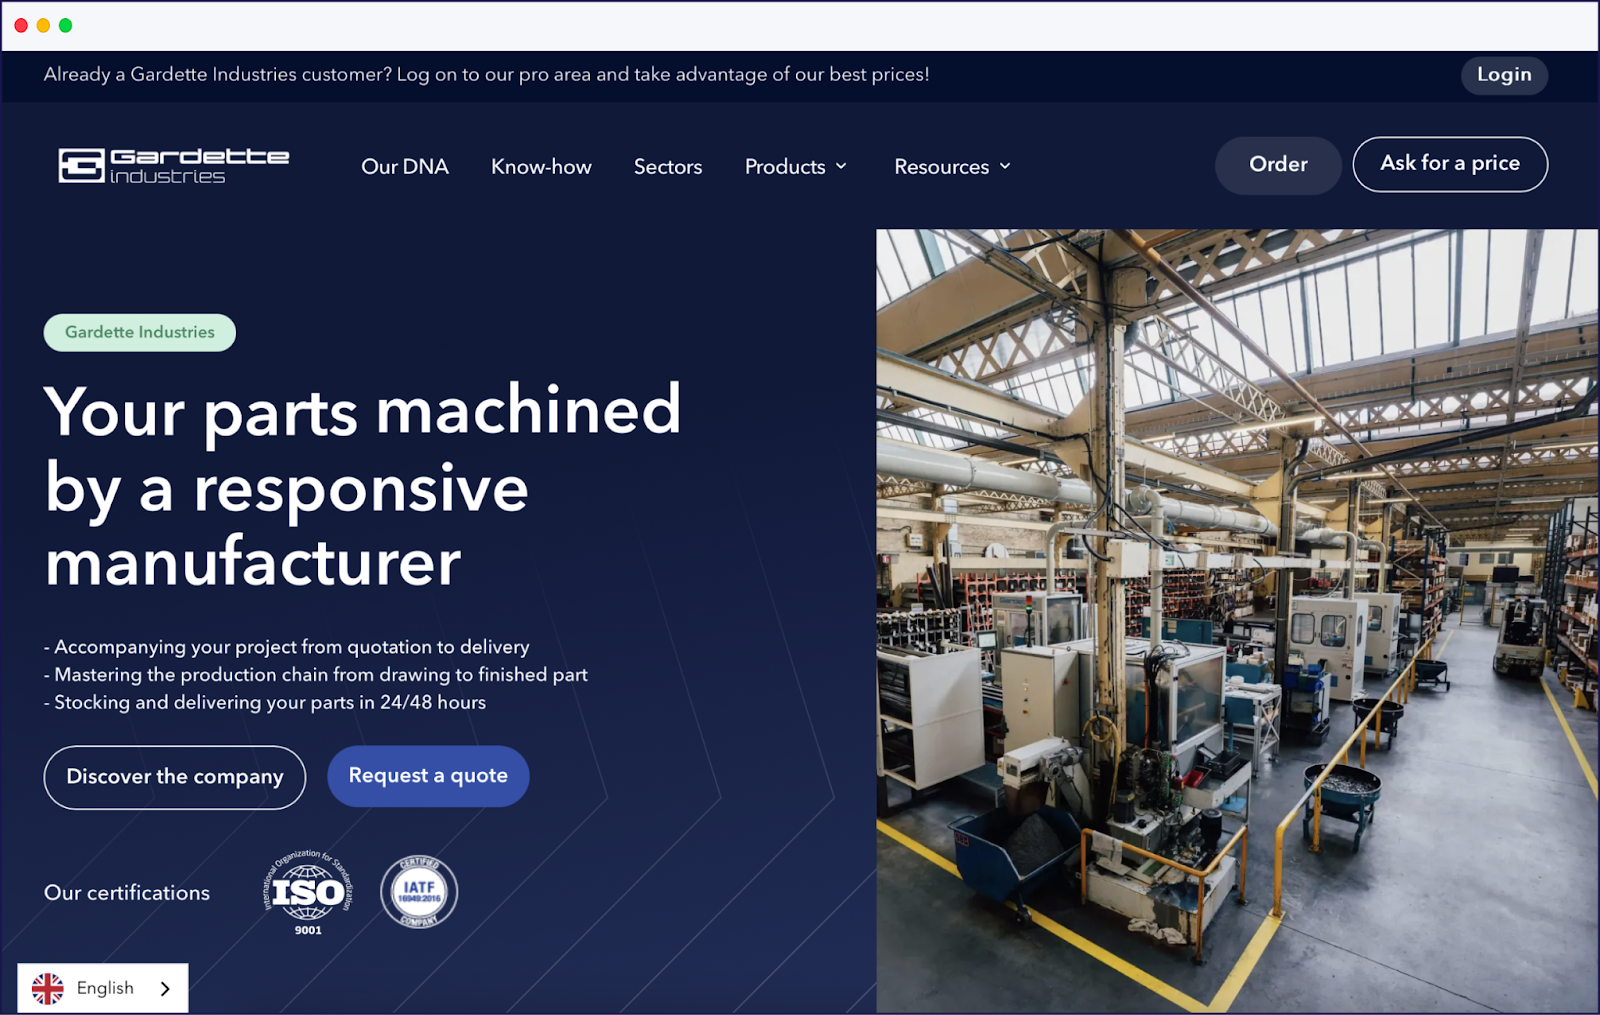
Given the contrast between the language button and the background of the website, the button is even more visible, naturally drawing the eye of the user to it.
However, you’ll want to carefully think about where to place these buttons. They shouldn’t block important content, nor should they be the primary area of interest on your website. The goal is to ensure the user gets what they want (a translated website in their preferred language) in as few clicks as possible.
Text Links
If you prefer a low-key language selector, you may want to consider text links. They’re usually found at the bottom of the page of your website. Plus, they’re a happy medium if you have too few languages for a full drop-down or selection menu but too many to merit their own buttons.
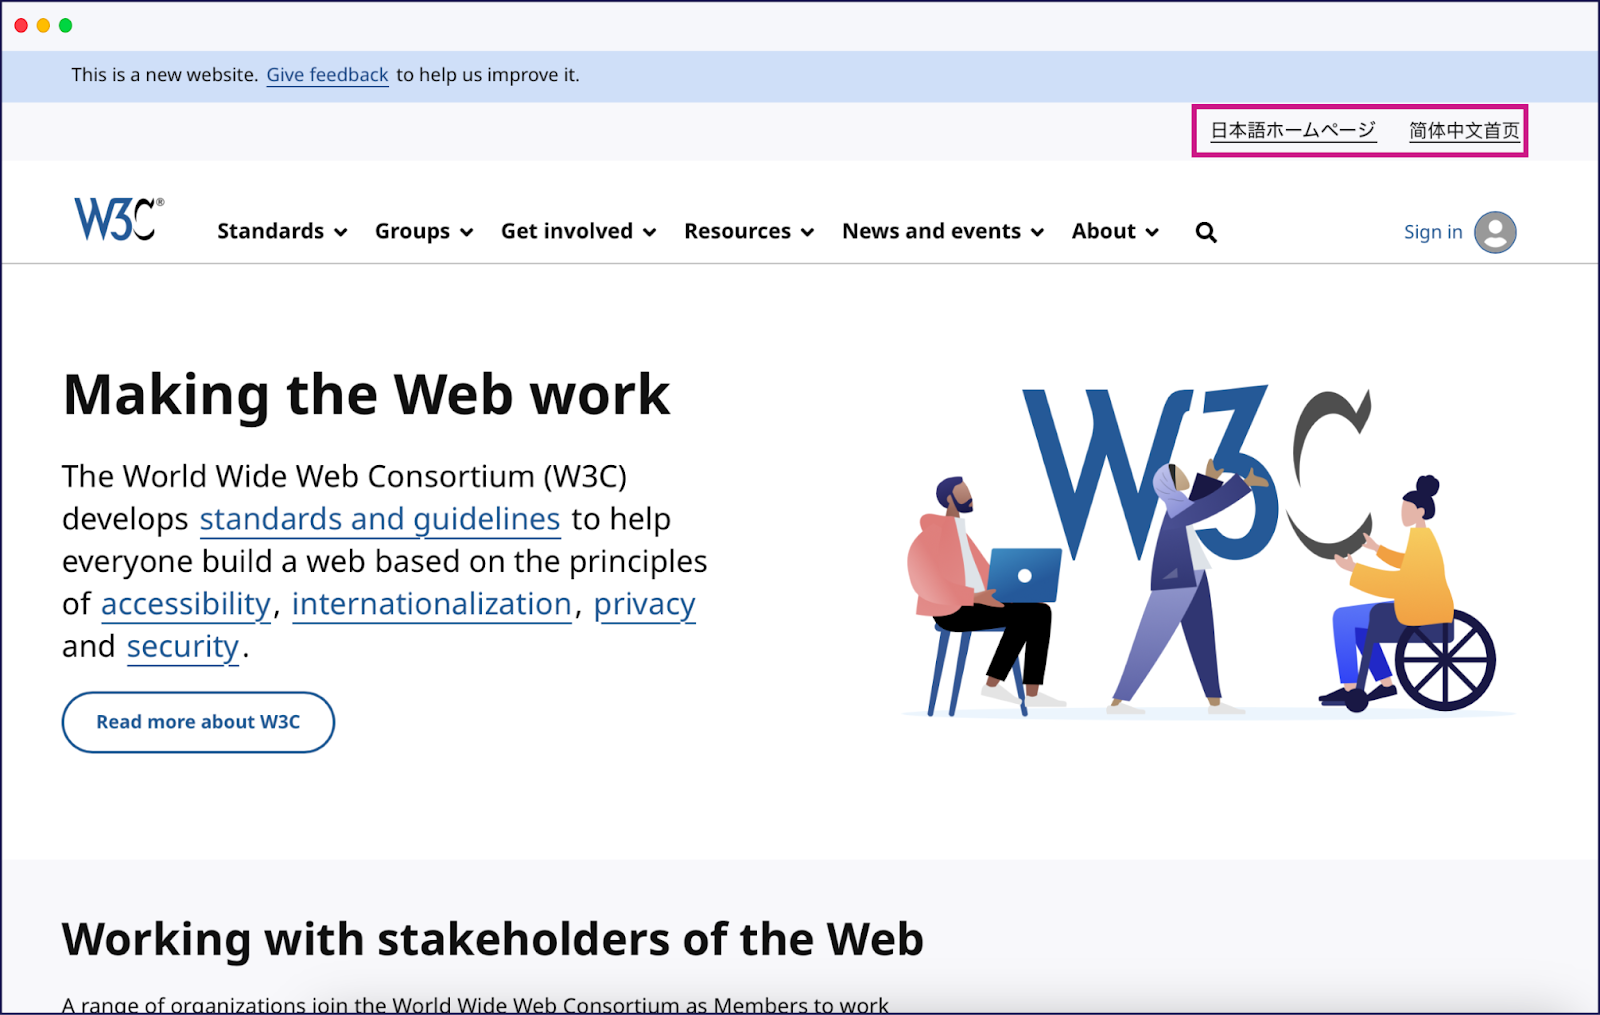
Here’s a good example: on W3C’s website, they’ve directly listed the Japanese and Simplified Chinese as text links.
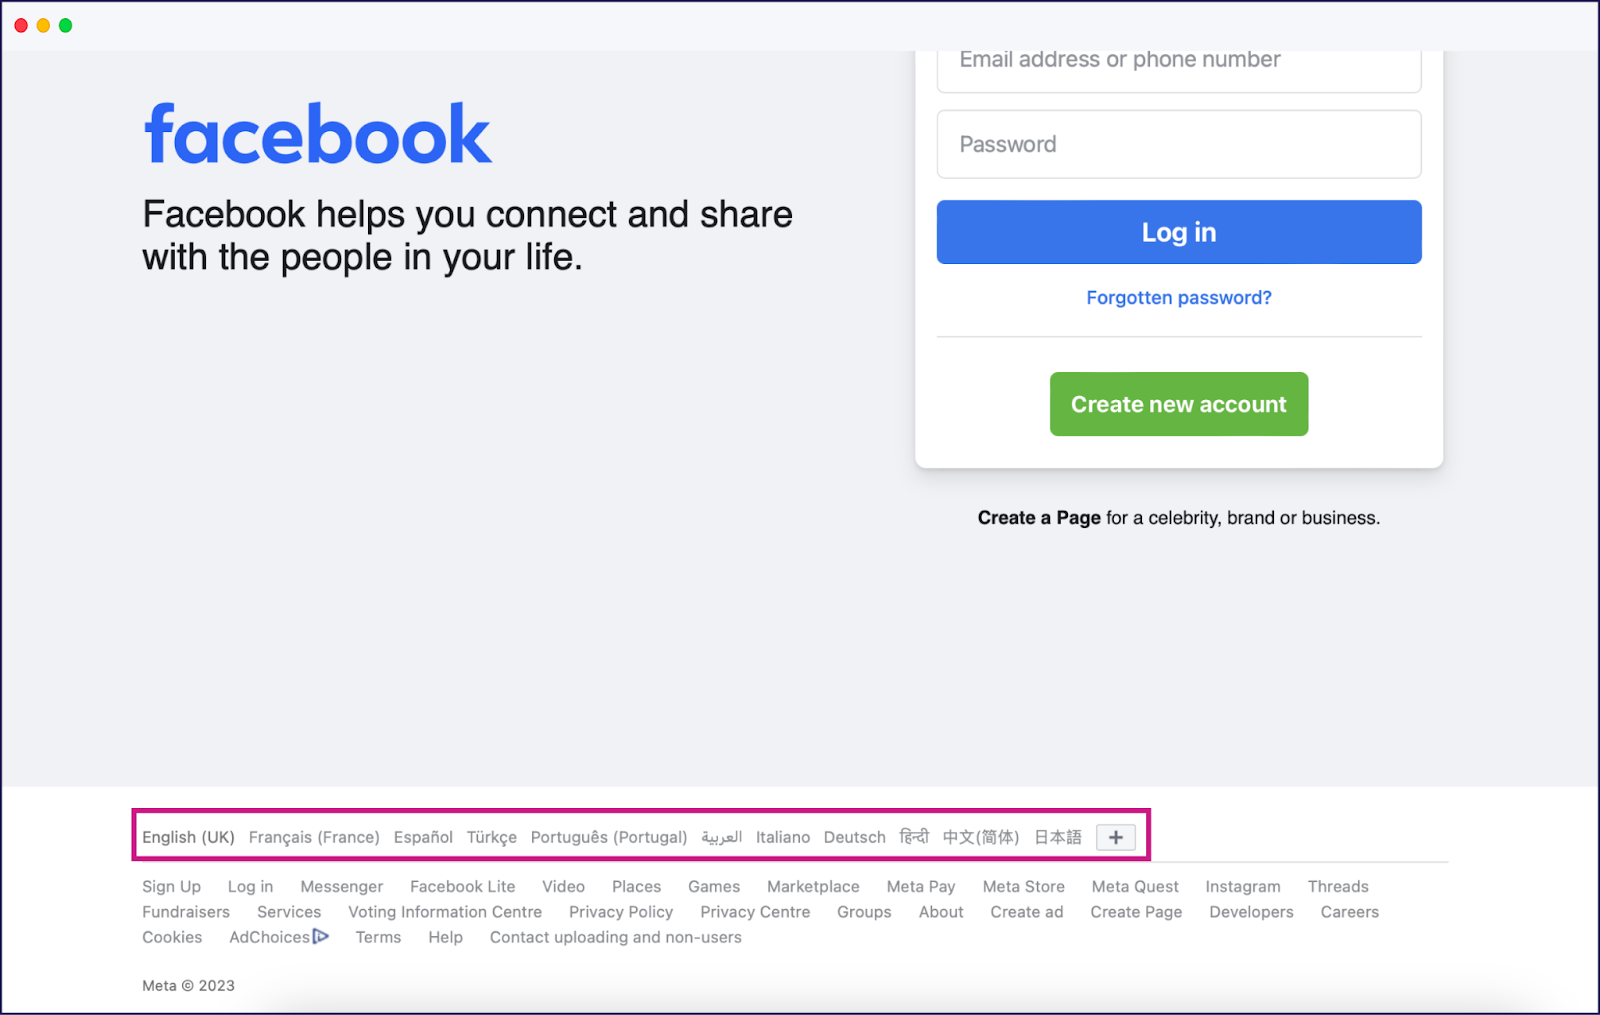
Facebook uses a hybrid mix of text links and a selection menu. They put their available languages on the very bottom of the page - you’ll have to scroll down when you land on the login:
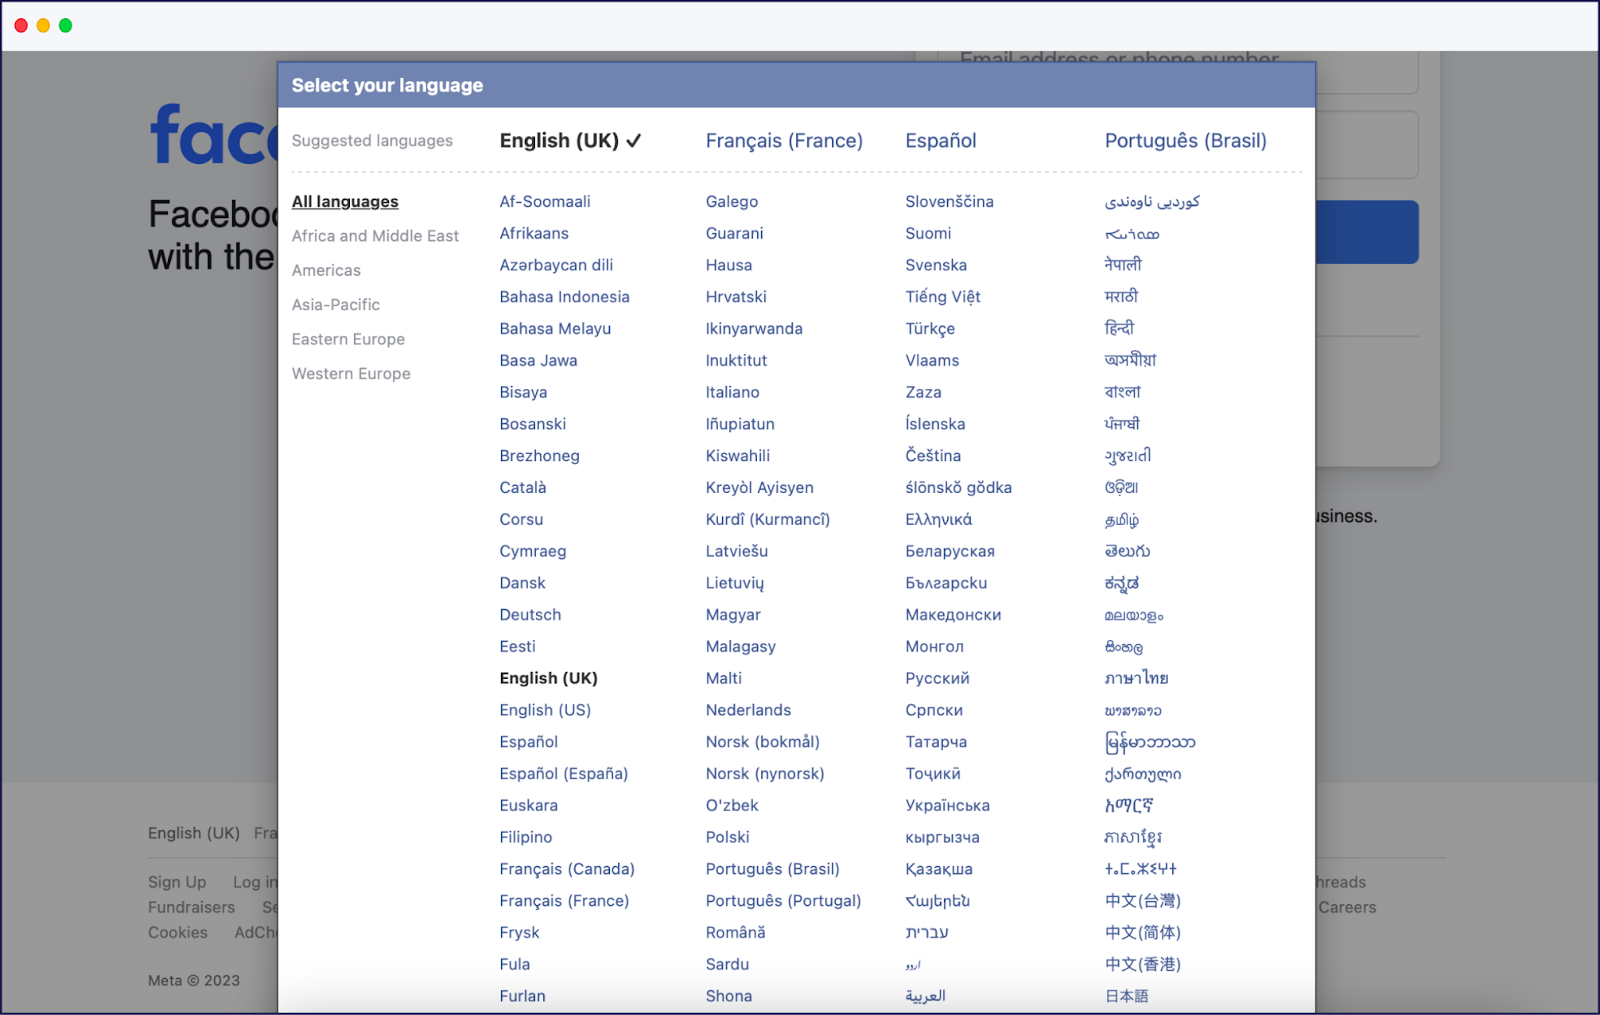
If you click the + button, you’ll land on an enormous selection menu of numerous languages.
Modal Windows
Modals are smaller windows that are triggered when you click something. They obscure the main page to disable its functions, but keeps it visible in the background. This indicates that you’ll return to the parent window once you interact with the modal.
When it comes to designing your website language selector, modals may be a contender since they’re typically eye-catching and stylish. Depending on how you configure it, the user will more easily be able to choose their preferred region and language.
Let’s take a look at Calvin Klein’s website as an example:
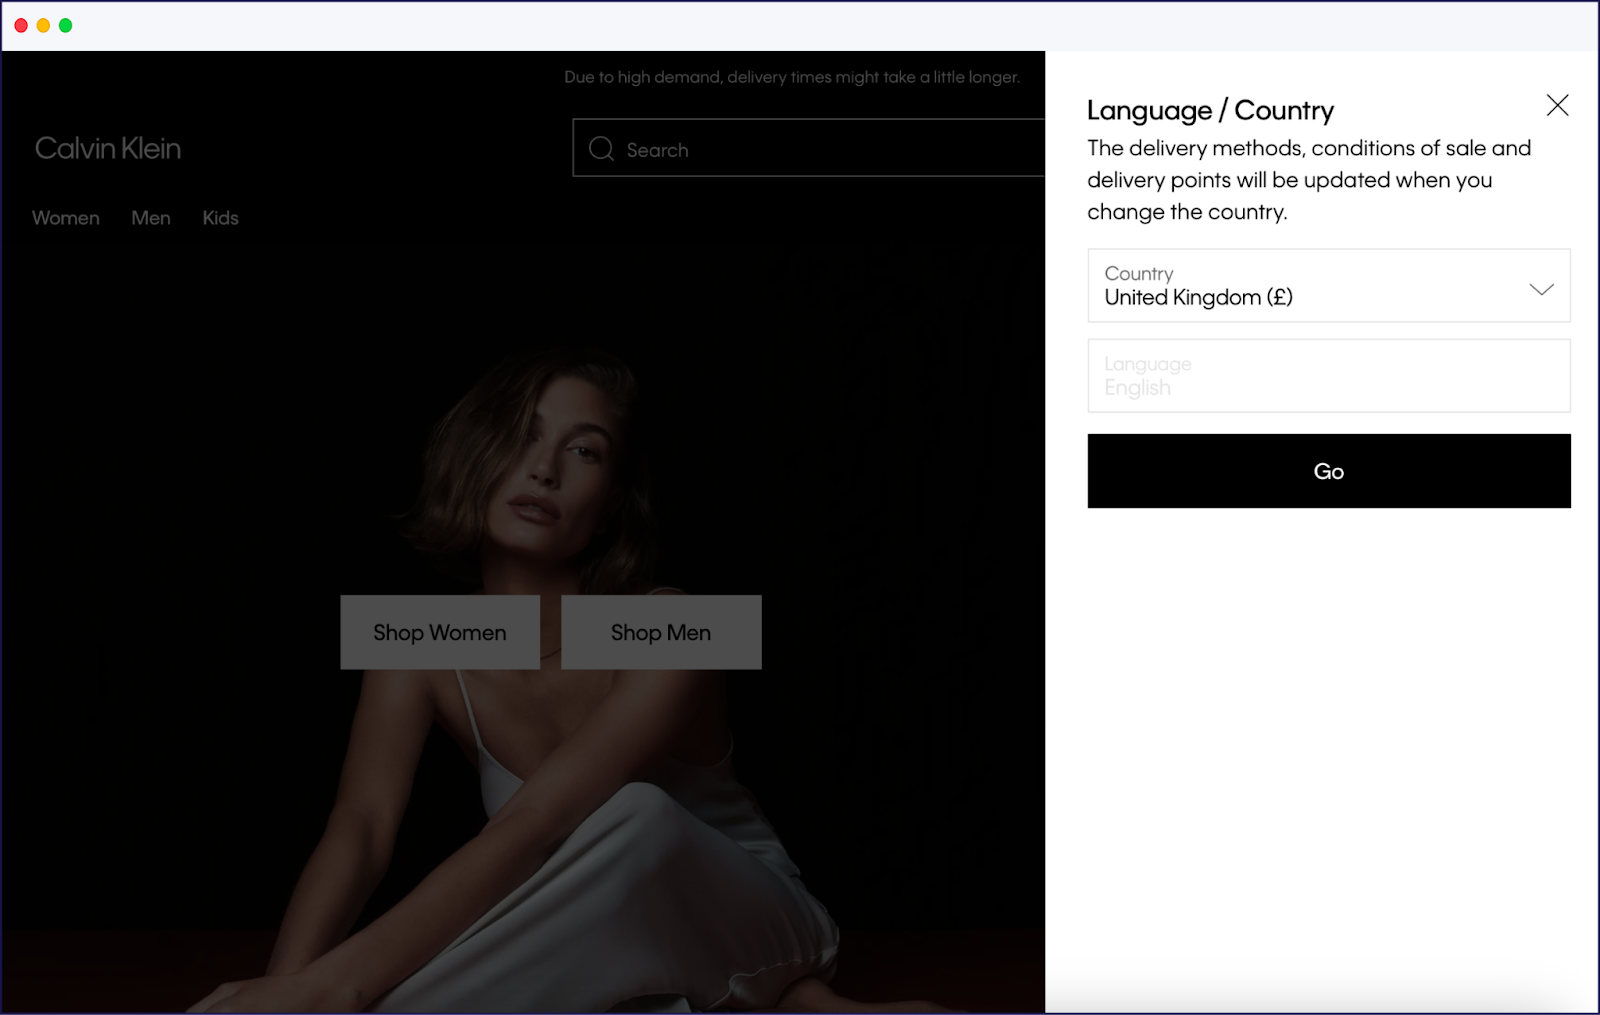
The website language selector is triggered by clicking on the globe icon in the upper right corner next to “Sign In/Register”. Once you click on it, the modal for choosing your preferred country and language will appear.
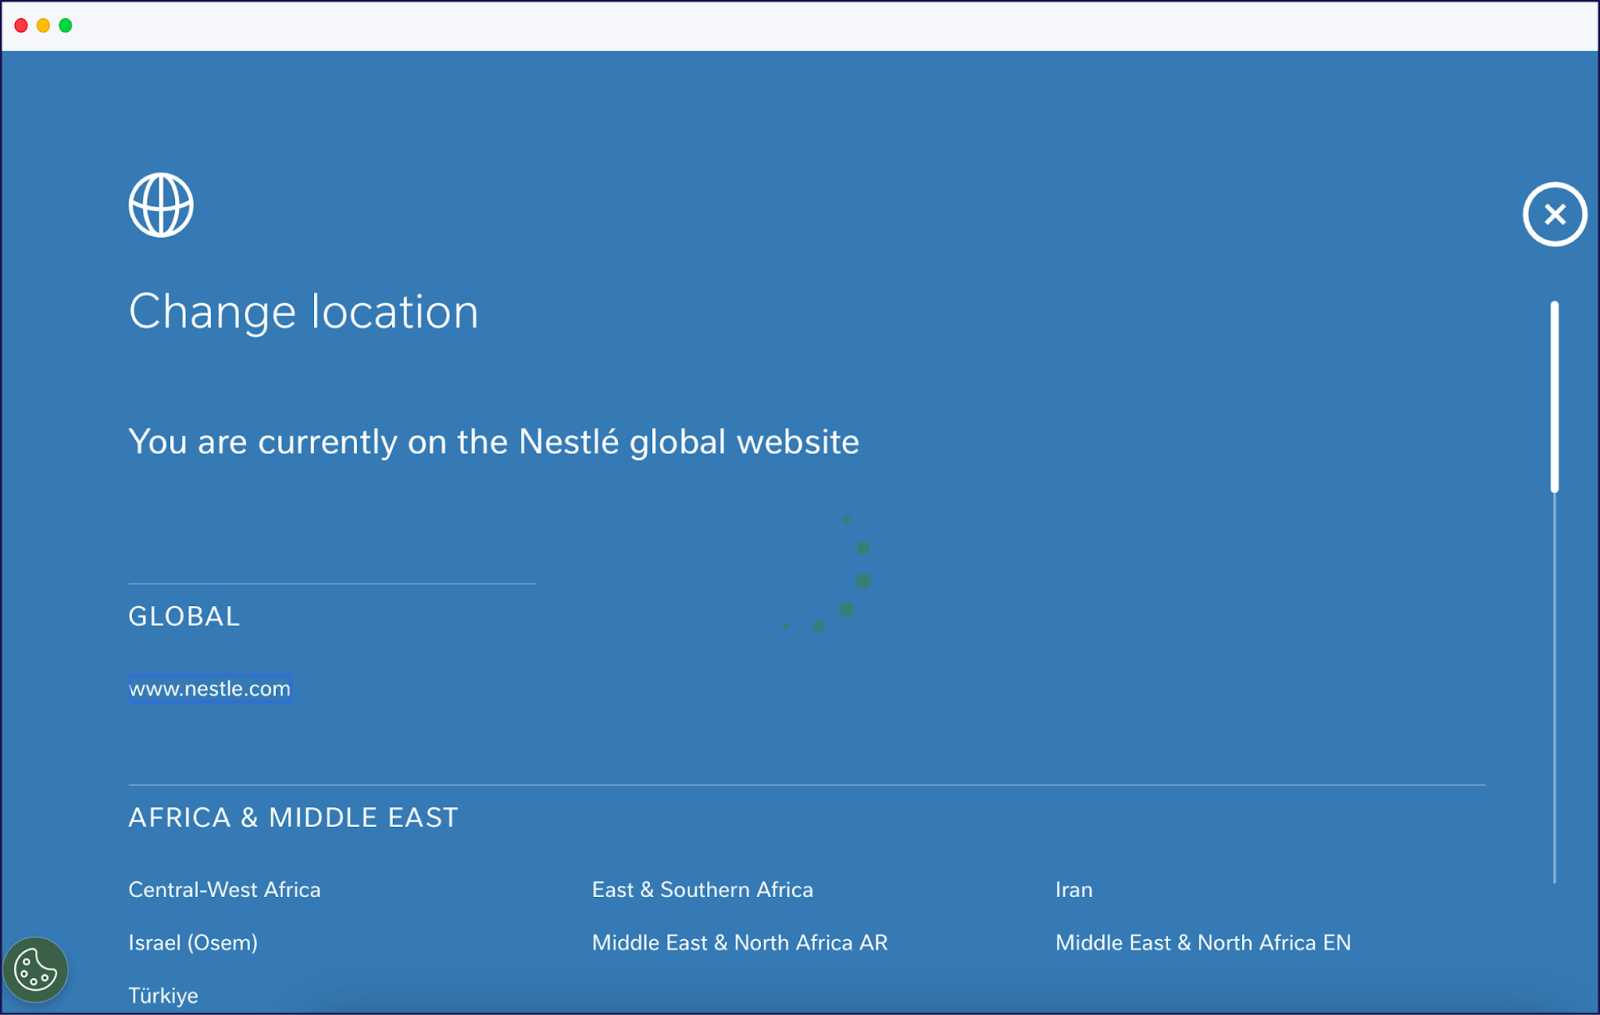
Another example is Nestlé. In the upper right corner of the page, it tells you on which website version you’re on.
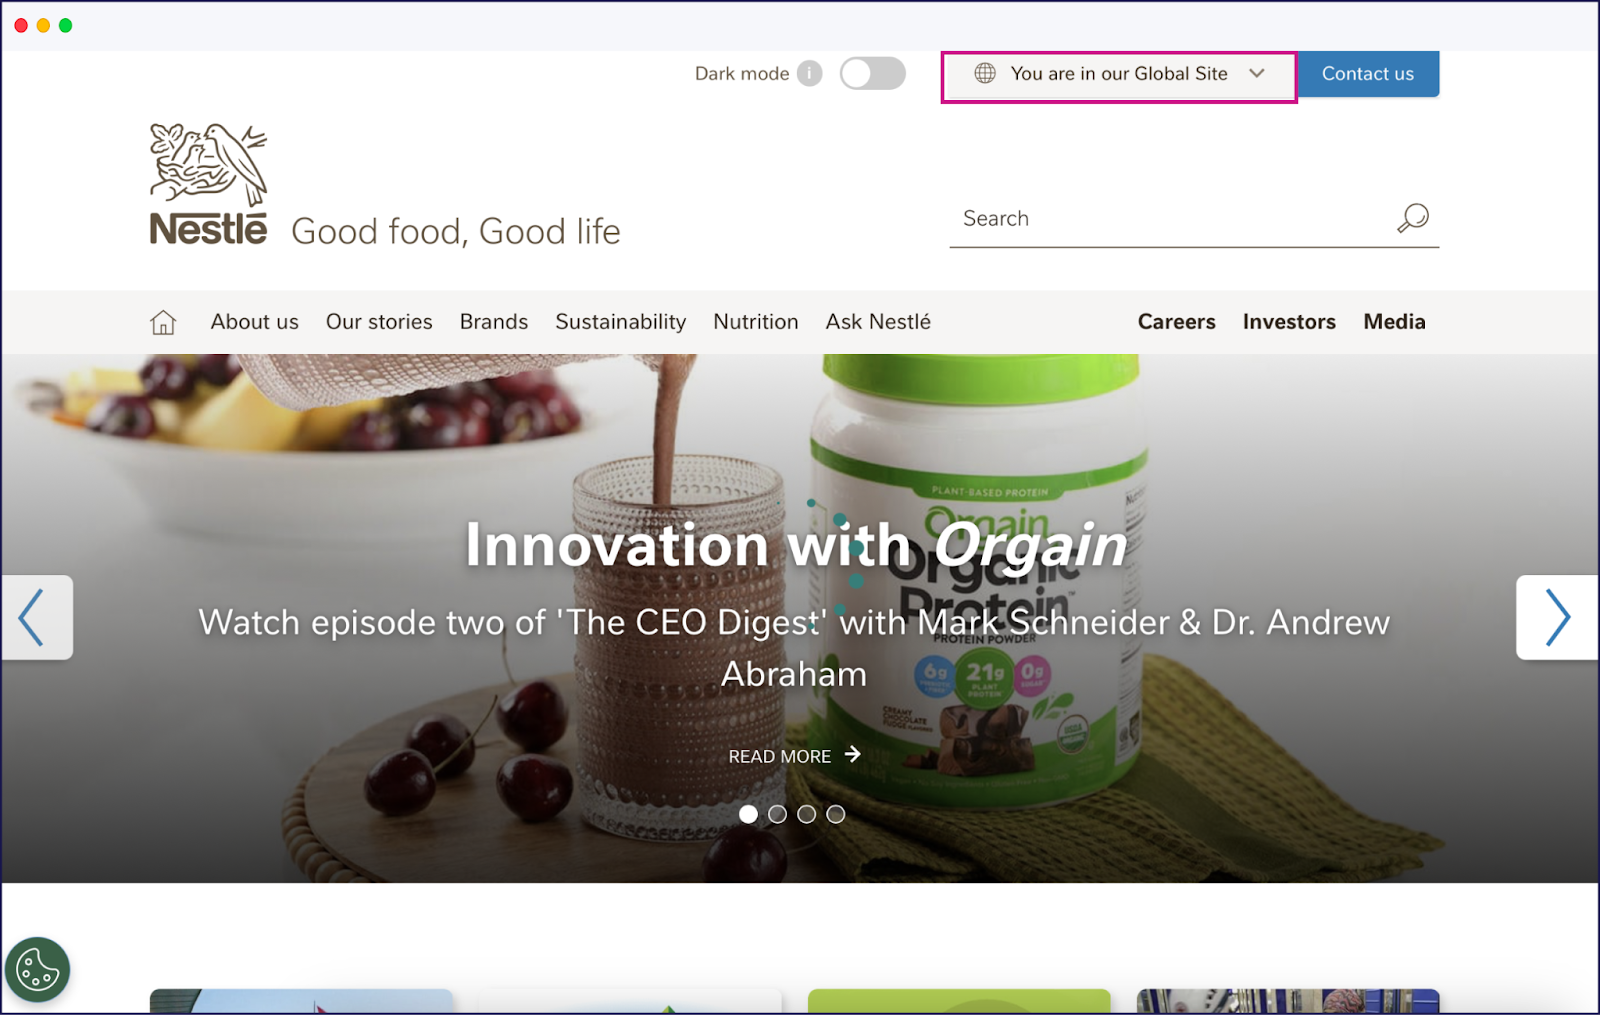
When you click on it, a modal that takes up the whole page (but is easy to exit out of, marked by the fairly large X button) will display.
While modals are certainly prominent, it’s important to take note that they can be disruptive to the user, just like popups. They interrupt their browsing experience and demand the user’s immediate attention.
They can be useful when you need to flag something vital to your user, such as privacy preferences, data usage, or warnings.
Using Website Translation Software to Customize Your Website’s Language Selector
Whether you’re in the process of creating a multilingual site or already have one up and running, you can use Weglot to improve how you translate your content and manage your overall translation process—with the added benefit that you get an easy-to-customize language selector.
First, some basics about Weglot:
- You can easily add Weglot to any CMS (WordPress, Squarespace, Wix, Shopify, and any custom-built platform).
- Weglot uses leading translation providers—from Google Translate to DeepL—to quickly and efficiently translate all the content on your website.
- You can translate your content into 110+ different languages. This includes right-to-left languages like Arabic and Hebrew.
- For each translation, Weglot sets up unique URLs. For example, weglot.com is our English site, while weglot.com/fr is our French site.
- All translated versions of your site are always kept up-to-date with any content changes. Weglot uses automatic content detection to notice any changes to content on your original site and update all translated versions of your site accordingly.
- You have complete control over your translations, so you can edit them, if necessary. You can also view your translations live on your site with a visual editor, so you can make changes to help your translated content fit your site’s design and layout.
More of a visual learner? Here’s a quick video that explains how Weglot works and how it can make your life easier when managing multilingual sites:
Most importantly, you can customize your language selection with Weglot. Each website translated by Weglot gets a language selector, so your visitors will be aware you offer translated versions of your content.
This brings us back here:
But with Weglot, you’re not stuck with just one design. From your dashboard, you can customize how your language switcher looks.

You can choose whether you will:
- Display the language name, or just the abbreviation/language code (such as EN for English, ES for Spanish, FR for French, and so on).
- Display a flag icon.
- Display the language selector as a drop-down box.
You can also pick which type of country flags you use (such as shiny or matte), and there’s a spot to add additional custom CSS (if you want to make further edits, so the language selector further matches your branding).
With Weglot, your language selector defaults to the bottom right of your website, but you can change the position of your selector if you’d like (top right corner, bottom left, etc.).
The process will look slightly different depending on your CMS, but here are two video tutorials, to provide some context:
Changing the position of your language selector when you’re using WordPress:
Changing the position of your language selector when you’re using Shopify:
If you added Weglot to your site with code, then you can still change the position of your language selector by following these instructions.
A Quick Recap: How to Customize Your Website Language Selector
There are two main ways to put a website language selector on your site:
- Design and develop your own. This isn’t a huge project, but it’s only necessary if you’re not currently using translation software to manage your multilingual site. When designing your language selector, keep in mind that it should be: (1) easy to find, (2) clear on what languages are offered, and (3) thematically similar to your design.
- Use website translation software. Any website translation software worth its salt will give you a customizable website language selector feature. Above, we looked at how you can customize your selector when you use Weglot’s translation software, including adding flags, displaying the full language name, and choosing where on your site your selector goes.
If you’re ready to let Weglot simplify your translation project for you and help you reach your global audience faster, start your free trial today.

Time to open your website to the world
Get started for free and have a multilingual website up and running in minutes.

Ready to display your website in multiple languages?
Try Weglot on your website for free (no credit card required).

Elizabeth Pokorny


